GTK+ とソケットを使ってチャット通信(Ruby)

20180917214400
 
20180917214517

Ruby/GTK2 の使い方が少しづつわかってきたので、ソケットを使ってチャット通信ソフトを作ってみました。上の例では Linux Mint 18.3 と Ubuntu Budgie を使って実行しています。

まずはサーバ側を立ち上げます。これはふつうに

$ ruby oshaberi.rb

と実行するだけです。次にクライアント側では、localhost や サーバの IPアドレスを指定して

$ ruby oshaberi.rb 192.168.11.7

みたいな感じで立ち上げます。もちろんインターネットに出てはいけません。LAN 内で遊んで下さい。

次に名前を訊いてくるので入れて下さい。

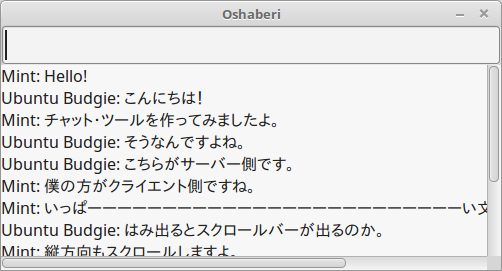
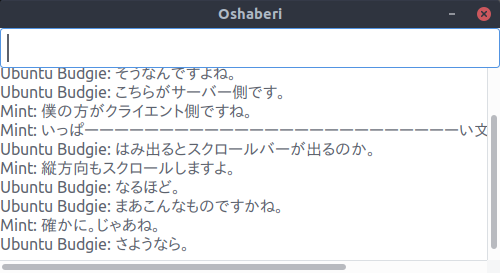
あとは上のエントリーバーから文字を入力すると、自分と相手側のスクロール・ウィンドウに会話の文字が表示されます。というように、簡単でしょう?


コードです。
oshaberi.rb

require 'gtk2'
require 'socket'

module Oshaberi
  class MyWindow < Gtk::Window
    def initialize
      super("Oshaberi")
      set_resizable(true)
      set_size_request(500, 300)
      
      entry = Gtk::Entry.new
      entry.set_editable(true)
      entry.set_height_request(40)
      entry.modify_font(Pango::FontDescription.new("13"))
      
      tv = Gtk::TextView.new
      tv.modify_font(Pango::FontDescription.new("12"))
      tv.set_editable(false)
      tv.set_cursor_visible(false)
      buf = tv.buffer
      
      sock1, sock2 = ARGV[0] ? client(ARGV[0]) : server
      sock1.set_encoding('UTF-8')
      sock2.set_encoding('ASCII-8BIT')
      
      myname, hisname = get_names(sock1, sock2)
      
      entry.signal_connect('activate') do
        st = entry.text
        buf.insert_interactive(buf.end_iter, myname + ": " + st + "\n", true)
        tv.scroll_mark_onscreen(buf.create_mark(nil, buf.end_iter, true))
        entry.set_text("")
        sock2.puts st
      end
      
      sw = Gtk::ScrolledWindow.new
      sw.set_policy(Gtk::POLICY_AUTOMATIC, Gtk::POLICY_AUTOMATIC)
      sw.add(tv)
      
      box = Gtk::VBox.new
      add(box)
      box.pack_start(entry, false, true, 0)
      box.pack_start(sw   , true , true, 0)
      
      Thread.new(sock1, tv, buf, hisname) do |sock, tv, buf, name|
        ioc = GLib::IOChannel.new(sock)
        ioc.add_watch(GLib::IOChannel::IN) do |i|
          buf.insert_interactive(buf.end_iter, name + ": " + (i.gets || exit), true)
          tv.scroll_mark_onscreen(buf.create_mark(nil, buf.end_iter, true))
          true    #繰り返し
        end
      end
      
      signal_connect("destroy") {Gtk.main_quit}
      show_all
    end
    
    Port = 29753
    
    def server
      s = TCPServer.open(Port)
      
      puts "接続を待っています..."
      sock2 = s.accept
      sock1 = s.accept
      puts "接続しました"
      [sock1, sock2]
    end
    
    def client(host)
      [TCPSocket.open(host, Port), TCPSocket.open(host, Port)]
    end
    
    def get_names(sock1, sock2)
      print "名前を入力して下さい: "
      myname = STDIN.gets.chomp
      myname = "" if myname.empty?
      sock2.puts myname
      hisname = sock1.gets.chomp
      hisname = "相手" if hisname == ""
      puts "相手の名前は #{hisname} です。"
      [myname, hisname]
    end
  end
  
  def self.start
    MyWindow.new
    Gtk.main
  end
end

Oshaberi.start


Ruby/GTK2 については下も参考にしてみて下さい。
marginalia.hatenablog.com

Ruby/SDL でテトリス

20180915120557
いやこれ、僕が作ったのではないのですよ。Gem 'rubysdl' のサンプルとして付属していたものを、多少改変しただけですが、きれいなコードで勉強になったのでここにメモしておきます。

コードは Gist に上げておきました。
Ruby/SDL でテトリス · GitHub
あと画像ファイル "icon.bmp" が必要ですので、これを使って下さい。これだけで動きます。必要な Gem は上にも書いたとおり 'rubysdl' ですので、$ gem install rubysdl や Bundler などでインストールして下さい。

キー操作はカーソルキーです。やってみればすぐわかります。
Linux Mint 18.3, Ruby 2.5.1 で確認しました。Ruby/SDLLinux へのインストールなどについてはここも参考にしてもらえればよいと思います。


コード・リーディングしていて思ったのですが、適切なクラス名、メソッド名、変数名を付けることは大事ですね。上のコードでは自分に読みやすいようにそのあたりを改変しました。改悪になっていないといいのですが。それから、多少のコメントを書き加えています。Bug fix は一箇所だけありました。これは Ruby 本体の仕様改変に伴うものだと思います。

そうそう、それから誰か、Windows への Ruby/SDL のインストールの仕方をアップデートしてくれないですかね。いまのままだとどうやっていいのかさっぱりわからない。残念ながら、自分でコードを調べてインストールする実力がないので。

ランダムかつ重複しないように文字列を生成する(Ruby)

あることのために必要だったので、複数の文字列をランダムかつ重複しないように生成するメソッドを書いてみました。

こんな感じです。

$ irb
irb(main):001:0> require_relative "generate_random_strings"
=> true
irb(main):002:0> Utils.generate_random_strings(40)
=> ["kk", "cm", "aq", "vf", "zf", "uh", "qv", "pv", "bb", "jp", "td", "ri", "mr",
    "hq", "gy", "pe", "ta", "ot", "ob", "km", "zu", "cz", "sf", "qo", "zt", "uq",
    "tc", "fd", "xq", "ki", "po", "w", "dj", "ks", "mw", "am", "zr", "az", "iy", "gv"]

重複しない 40個の文字列(アルファベット小文字)が生成されて Array で返ります。文字の長さは最小になるようになっているので、長さ 1 と 2 の文字列が入り混じっています。

文字列の長さを指定して呼ぶこともできます。

irb(main):003:0> Utils.generate_random_strings(40, 4)
=> ["bakz", "aipi", "prgo", "cwfw", "qqkv", "lgtt", "neid", "jjjz", "cjst", "tdfd",
    "sguf", "nkqk", "bvpl", "tldk", "qszi", "qfvj", "mnjy", "epsd", "abix", "ldap",
    "lijm", "jqzl", "gclu", "fxxe", "tcxc", "rayu", "rcsn", "aitp", "focj", "ngxd",
    "ouxc", "reze", "svxc", "ppaz", "roeb", "qgdt", "mhdw", "ewap", "fxjb", "mmrx"]

長さ 4 のランダムな文字列が 40個返りました。


コード。
generate_random_strings.rb

module Utils
  def repeated_permutation(a, b)
    a ** b
  end
  
  def generate_random_strings(num, string_length = nil)
    table = [*"a".."z"]
    limit = [0, 26, 702, 18278, 475254, 12356630]
    result = []
    generate_string1 = ->(n, l) {
      st = ""
      l.times do
        a, n = n % 26, n / 26
        st = table[a] + st
      end
      st
    }
    generate_string2 = ->(n) {
      idx = limit.find_index {|i| i > n}
      generate_string1.(n - limit[idx - 1], idx)
    }
        
    if string_length and 26 < string_length
      raise "Given length of strings too big."
    end
    
    num_table = Set.new
    if string_length
      n = Utils.repeated_permutation(26, string_length)
      raise "Given length of strings too small." if n < num
      while num_table.size < num
        num_table << rand(n)
      end
      num_table.each {|i| result << generate_string1.(i, string_length)}
    else
      idx = limit.find_index {|i| i >= num}
      raise "Result Array too big." unless idx
      while num_table.size < num
        num_table << rand(limit[idx])
      end
      num_table.each {|i| result << generate_string2.(i)}
    end
    result
  end
  module_function :repeated_permutation, :generate_random_strings
end


Gem 化

Gem 'kaki-utils' に同梱しました。$ gem install kaki-utils や Bundler でインストールできます。

$ bundle exec irb
irb(main):001:0> require 'kaki/utils'
=> true
irb(main):002:0> Utils.generate_random_strings(40)
=> ["qv", "kj", "wf", "ch", "ds", "hp", "ro", "oj", "xa", "dz", "vv", "zz", "fh",
    "rf", "tr", "gw", "cf", "yx", "ep", "pr", "tl", "sn", "ar", "ao", "ij", "pl", "my",
    "gy", "sk", "yk", "to", "hq", "wj", "vf", "jh", "pu", "cg", "gq", "wu", "dx"]

みたいな感じ。

Ruby/Rouge でコードをシンタックスハイライトした HTML と CSS を出力させる

Ruby コードを HTML化して、ついでにシンタックスハイライトもできるようにできないか、やってみました。
20180903012354
画像だとこんな感じです。全体はこういう風です。

RubyGem 'rouge' というものを使いました。インストールはふつうに $ gem install rouge とかBundler でどうぞ。

とりあえず HTML と CSS を吐かせるのにかなり苦労しました。上の HTML, CSS ファイルはこんなコードで出力しています。
rouge_sample.rb

require 'rouge'

source = File.read('oekaki_sample16.rb')
formatter = Rouge::Formatters::HTML.new
lexer = Rouge::Lexers::Ruby.new

html = formatter.format(lexer.lex(source))
css = Rouge::Themes::ThankfulEyes.render(scope: '.highlight')

html1 = <<EOS
<!DOCTYPE html>
<html lang="ja">
<meta http-equiv="Content-Type" content="text/html; charset=UTF-8">
<title>Syntax-Highlight</title>
<head>
<link rel="stylesheet" type="text/css" href="rouge_sample1.css">
<style type="text/css">
pre.highlight {
  font-family: Liberation Mono, Consolas, monospace, sans-serif;
  font-size: 86%;
  padding: 10px;
  line-height: 1.1em;
}
</style>
</head>
<body>

<pre class="highlight">
EOS
html = html1 + html + "</pre>\n\n</body>\n</html>"

open("rouge_sample1.html", "w") {|io| io.write(html)}
open("rouge_sample1.css",  "w") {|io| io.write(css)}

色の付け方は Rouge::Themes::ThankfulEyes のところで指定しています。ここでは ThankfulEyes を選んでいますが、Colorful, Github など、いろいろ選べます。詳しくはこちらを見て下さい。
また、表示させるソースの種類はRouge::Lexers::Ruby.new で指定しています。これなら Ruby ですね。他のものはこちらを見て下さい。たいていのものはあるのではないでしょうか。

円落下の JavaScript 版

obelisk.hatenablog.comここの JavaScript 版です。ボタンをクリックしてみて下さい。

コード。

<script type="text/javascript">
function circleFall(width, height) {
    var w = window.open("", null, "width=" + width + ",height=" + height);
    w.focus();
    w.document.open();
    var st = `
    <!DOCTYPE html>
    <html lang="ja">
    <title>Canvas</title>
    <body style="margin: 0; overflow: hidden;">
    <canvas id="circleFallCanvas" width="${width}" height="${height}"></canvas>
    </body>
    </html>
`;
    w.document.write(st);
    w.document.close();
    
    var canvas = w.document.getElementById("circleFallCanvas");
    var wd = w.innerWidth; var ht = w.innerHeight;    //Chrome は 0 を返す
    if (wd != 0) {width  = wd;}
    if (ht != 0) {height = ht;}
    canvas.width  = width;
    canvas.height = height;
    var context = canvas.getContext("2d");
    
    var max_r, min_r, colorMax, maxNum;
    max_r = 40; min_r = 10;
    colorMax = 256;
    maxNum = 60;
    
    var Circle = function(f) {
        function rnd(num) {return Math.random() * num;}
        
        this.maxR = rnd(max_r - min_r) + min_r;
        this.x = rnd(width);
        this.color = "rgb(" + String(rnd(colorMax)) + "," + String(rnd(colorMax)) +
                          "," + String(rnd(colorMax)) + ")";
        this.fallStep = rnd(3) + 1;
        this.r = 1;
        this.r_step = rnd(0.8) + 0.2;
        if (f) {
            this.y = rnd(height);
        } else {
            this.y = -rnd(max_r);
        }
        
        this.paint = function() {
            context.beginPath();
            context.fillStyle = this.color;
            context.arc(this.x, this.y, this.r, 0, 2 * Math.PI);
            context.fill();
            this.y += this.fallStep;
            this.r += this.r_step;
            if (this.r > this.maxR || this.r < 1) {this.r_step *= -1}
            if (this.y > height + max_r) {return true}
            return false;
        }
    }
    
    var circles = [];
    for (var i = 0; i < maxNum; i++) {circles[i] = new Circle(true);}
    
    window.draw = function() {
        context.fillStyle = "black";
        context.fillRect(0, 0, width, height);
        
        for (var i = 0; i < maxNum; i++) {
            if (circles[i].paint()) {circles[i] = new Circle(false);}
        }
    }
    
    var id = setInterval("draw()", 80);
    function bul() {clearInterval(id);}
    w.onbeforeunload = bul;
}
</script>
<form><input type="button" value="アニメーション" onclick="circleFall(1000, 700)">
 <input type="button" value="(小さい版)" onclick="circleFall(800, 600)"></form>

Ruby で関数型プログラミングっぽく(コピペ) + Haskell 版

parrot.hatenadiary.jpここのブログ記事を読んで感銘を受けました。だからこれを読んでもらえればよいのですが、せっかくなのでコピペしておきます。元記事に感謝です。

まずは問題。

ある数字にそれを逆に並べた数字を足すという計算を、
回文数(上から読んでも下から読んでも同じ数)になるまで繰り返すとき、
もっとも計算回数を要する二桁の数を答えなさい
 
例:ab+ba=123の場合、123+321=444で回文数なので、2回となる

https://parrot.hatenadiary.jp/entry/20110302/1299051431

 
Ruby コードです。多少自己流に書き直しました。

reverse_num = ->(num) {num.to_s.reverse.to_i}
is_palindrome = ->(num) {num == reverse_num.(num)}
execute = ->(count, num) {
  r = num + reverse_num.(num)
  is_palindrome.(r) ? count : execute.(count + 1, r)
}

result = (10..99).map{|n| [n, execute.(1, n)]}
max_count = result.map(&:last).max
result.select{|r| r.last == max_count}.each{|r| puts "num:#{r.first} count:#{r.last}"}

結果。89 と 98 ですね。24回繰り返しています。

$ time ruby palindrome_num.rb
num:89 count:24
num:98 count:24

real	0m0.091s
user	0m0.076s
sys	0m0.012s

 
いや、すばらしい。
 

Haskell

頑張って Scala ならぬ Haskell で同様のことをやってみました。
palindrome_num.hs

reverseNum :: Int -> Int
reverseNum num = read $ reverse $ show num

isPalindrome :: Int -> Bool
isPalindrome num = (num == reverseNum num)

execute :: Int -> Int -> Int
execute count num = if isPalindrome r
                    then count
                    else execute (count + 1) r
                        where r = num + reverseNum num
                        
main :: IO ()
main = putStr $ unlines $ map toS $ [r | r <- result, last r == maxCount]
           where result = [[n, execute 1 n] | n <- [10..99]]
                 maxCount = maximum $ map last result
                 toS [a, b] = "num:" ++ show a ++ " count:" ++ show b

こんなのでいいのかな。
結果。

$ time ./palindrome_num
num:89 count:24
num:98 count:24

real	0m0.003s
user	0m0.000s
sys	0m0.000s

当然のことながら瞬殺ですな。

しかし、Ruby でも結構関数型っぽく書けますね。ほとんどそのまま Haskell になるじゃん。自分は Ruby で慣れているので、Ruby の方が見やすいくらいだ。以下の記事もよろしければどうぞ。
obelisk.hatenablog.com


すごいHaskellたのしく学ぼう!

すごいHaskellたのしく学ぼう!

  • 作者:Miran Lipovača
  • 発売日: 2012/05/23
  • メディア: 単行本(ソフトカバー)
 

追記(2020/12/4)

Ruby 版後半があまり美しくないので、少し凝ってみる。

module Enumerable
  def max_select
    pool = []
    max_num = -Float::INFINITY
    each do |i|
      n = yield(i)
      if n > max_num
        max_num = n
        pool = [i]
      elsif n == max_num
        pool << i
      end
    end
    [max_num, pool]
  end
end

Enumerable#max_selectは、ブロックの返り値の最大値(max_num)を求めて、そのような最大値になるようなものをレシーバーからコレクトし(pool)、[max_num, pool]を返すメソッド。例えばこんな風に使える。ローマ字化した県名のうち、もっとも文字数が長いもの。

url = "https://gist.githubusercontent.com/koseki/38926/raw/671d5279db1e5cb2c137465e22424c6ba27f4524/todouhuken.txt"
prefectures = URI.open(url).each_line.map {|l| l.chomp.split.last}
prefectures.max_select(&:size)
#=>[9, ["fukushima", "yamanashi", "hiroshima", "yamaguchi", "tokushima", "kagoshima"]]

9文字が最大値だとわかる。

まあ、他に使いみちがあるかどうかわからないものだが(笑)、これを使って以下のように。

reverse_num = ->(num) {num.to_s.reverse.to_i}
is_palindrome = ->(num) {num == reverse_num.(num)}
execute = ->(num, count = 1) {
  r = num + reverse_num.(num)
  is_palindrome.(r) ? count : execute.(r, count + 1)
}

count, numbers = (10..99).max_select(&execute)
puts "max count: #{count}"
puts "number: #{numbers}"

ちょっと関数型プログラミングっぽいかも知れない笑。