Ruby で簡単なタートルグラフィックスを実装して、いろいろ再帰曲線を描いてみました。描画には自作の Gem 'oekaki' を使っています。
oekaki | RubyGems.org | your community gem host
GTK+でお絵かきしてみた(Ruby) - Camera Obscura
※追記
Gem化しました。
Gem 'oekaki' にタートルグラフィックスを追加 - Camera Obscura
再帰曲線を描くなら、L-system も参考になると思います。これも実装しました。
再帰曲線を描く言語「L-system」を Ruby で実装した - Camera Obscura
タートルグラフィックスの実装はこんな感じです。
turtle.rb(Gist)
class Turtle
  def initialize(width, height, ob)
    @width, @height = width, height
    @pen_po = Vector[0, 0]
    @pen = ob
    @dir = Vector[1, 0]
    @color = [65535, 65535, 65535]
  end
  attr_accessor :pen_po, :dir

  def left(deg)
    θ = PI * deg / 180
    @dir = Matrix[[cos(θ), -sin(θ)], [sin(θ), cos(θ)]] * @dir
  end

  def right(deg)
    left(-deg)
  end

  def forward(length, draw = true)
    next_po = @pen_po + @dir * length
    if draw
      @pen.color(*@color)
      @pen.line(@width / 2 + next_po[0], @height / 2 - next_po[1],
         @width / 2 + @pen_po[0], @height / 2 - @pen_po[1])
    end
    @pen_po = next_po
  end

  def back(length)
    forward(-length, false)
  end

  def color(r, g, b)
    @color = [r, g, b]
    @pen.color(*@color)
  end

  def circle(radius, fill = false)
    @pen.color(*@color)
    @pen.circle(fill, @width / 2 + @pen_po[0], @height / 2 - @pen_po[1], radius)
  end

  def move(x, y)
    @pen_po = Vector[x, y]
  end
end
特にむずかしいところはないと思います。なお、内部の座標 @pen_po は原点がキャンバスの中心で、(x, y) 座標の向きは数学の慣例どおり(つまり、y 座標は上がプラス方向)です。メソッド left(), right() は向きの回転、forward(length, draw) は長さ length だけ前進(draw が false なら位置が移動するだけで描画されない)、circle(radius, fill) はペンの位置に半径 radius の円を描く(fill が true ならば内部を満たす)、move() はその座標へ移動、back(length) は length だけ戻る(描画はされない)。
Gem 'oekaki' が内部で require 'matrix', include Math をしているので、行列・ベクトル演算と Math モジュールがそのまま使えます。Turtle.new(w, h, self) は draw メソッドなどのブロック内で行って下さい。(インスタンスはブロックの外へ持ちだしてもかまいません。)
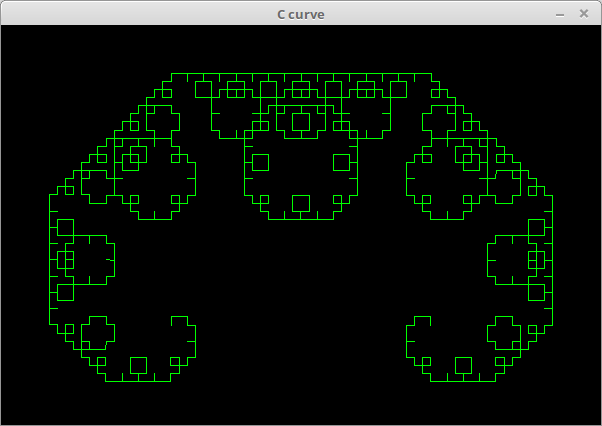
C曲線。Gist。
require 'oekaki'
require_relative 'turtle'

Width, Height = 600, 400

Oekaki.app width: Width, height: Height, title: "C curve" do
  draw do
    clear

    t = Turtle.new(Width, Height, self)
    t.move(-130, -100)
    t.color(0, 65535, 0)
    ratio = sqrt(2) / 2

    drawing = lambda do |length, depth|
      if depth.zero?
        t.forward(length)
      else
        t.left(45)
        drawing[length * ratio, depth - 1]
        t.right(90)
        drawing[length * ratio, depth - 1]
        t.left(45)
      end
    end

    drawing[260.0, 10]
  end
end
シェルピンスキー曲線。Gist。

require 'oekaki'
require_relative 'turtle'

Width, Height = 600, 600

Oekaki.app width: Width, height: Height, title: "Sierpinski curve" do
  draw do
    clear

    depth = 5
    l = 550
    num = 2 ** (depth - 1)

    t = Turtle.new(Width, Height, self)
    t.color(0xffff, 0, 0xffff)
    step = l / ((2 * sqrt(2) + 1) * num + num - 1)
    t.move(-l / 2 + step / sqrt(2), l / 2)

    drawing = lambda do |depth, angle = 45|
      if depth.zero?
        t.forward(step)
      else
        t.right(angle)
        drawing[depth - 1, -angle]
        t.left(angle)
        t.forward(step)
        t.left(angle)
        drawing[depth - 1, -angle]
        t.right(angle)
      end
    end

    4.times do
      drawing[2 * depth - 1]
      t.right(45)
      t.forward(step)
      t.right(45)
    end
  end
end
コッホ曲線。Gist。

require 'oekaki'
require_relative 'turtle'

Width, Height = 600, 600

Oekaki.app width: Width, height: Height, title: "Koch curve" do
  draw do
    clear

    l = 500
    t = Turtle.new(Width, Height, self)
    t.color(0, 65535, 65535)
    t.move(l / 2, -150)
    t.dir = Vector[-1, 0]

    drawing = lambda do |length, depth|
      if depth.zero?
        t.forward(length)
      else
        drawing[length / 3, depth - 1]
        t.left(60)
        drawing[length / 3, depth - 1]
        t.right(120)
        drawing[length / 3, depth - 1]
        t.left(60)
        drawing[length / 3, depth - 1]
      end
    end

    3.times do
      drawing[l, 3]
      t.right(120)
    end
  end
end
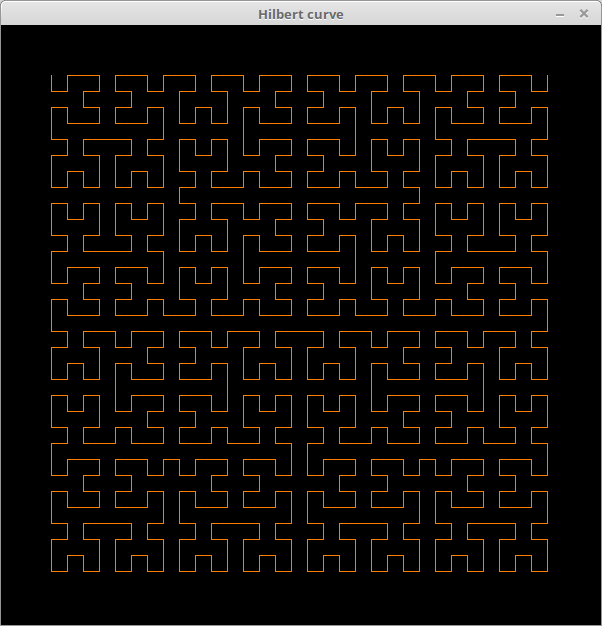
ヒルベルト曲線。Gist。
require 'oekaki'
require_relative 'turtle'

Width, Height = 600, 600

Oekaki.app width: Width, height: Height, title: "Hilbert curve" do
  draw do
    clear

    depth = 5

    l = 500
    t = Turtle.new(Width, Height, self)
    t.color(0xffff, 0x7dff, 0)
    t.move(-l / 2, l / 2)
    step = l / (2 ** depth - 1)

    drawing = lambda do |depth, angle|
      if depth.zero?
        return
      else
        t.right(angle)
        drawing[depth - 1, -angle]
        t.forward(step)
        t.left(angle)
        drawing[depth - 1,  angle]
        t.forward(step)
        drawing[depth - 1,  angle]
        t.left(angle)
        t.forward(step)
        drawing[depth - 1, -angle]
        t.right(angle)
      end
    end

    drawing[depth, 90]
  end
end
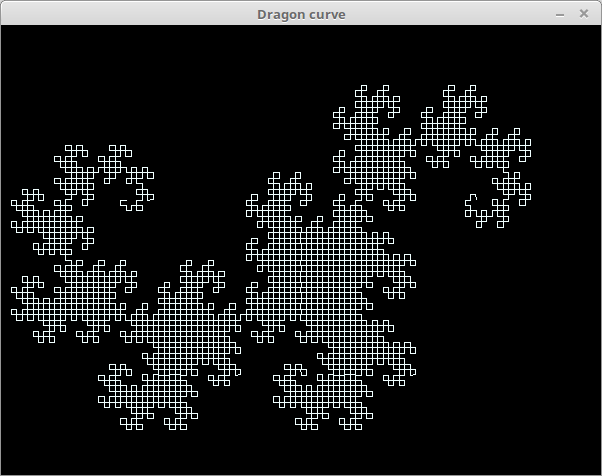
ドラゴン曲線。Gist。
require 'oekaki'
require_relative 'turtle'

Width, Height = 600, 450

Oekaki.app width: Width, height: Height, title: "Dragon curve" do
  draw do
    clear

    depth = 12

    l = 350
    t = Turtle.new(Width, Height, self)
    t.color(0xf0ff, 0xffff, 0xffff)
    t.move(-l / 2, 50)

    drawing = lambda do |length, depth|
      if depth.zero?
        t.forward(length)
      else
        len = length / sqrt(2)
        po1 = t.pen_po
        t.forward(length, false)
        po2, t.pen_po = t.pen_po, po1
        t.right(45)
        drawing[len, depth - 1]
        t.pen_po = po2
        t.right(90)
        drawing[len, depth - 1]
        t.pen_po = po2
        t.left(135)
      end
    end

    drawing[l, depth]
  end
end
参考にしたサイト。(ありがとうございます!)
再帰プログラムによるフラクタル図形の描画:CodeZine(コードジン)
再帰曲線で遊ぼう
Pythonとタートルグラフィックスによる(再帰)プログラミング教育処方案 - Read -> Blog
特にいちばん下のブログ記事がすごいです。せっかくなので出来るだけ自力でやりました^^;
追加
このサイトの描画例を Python から移植しました。ありがとうございます!
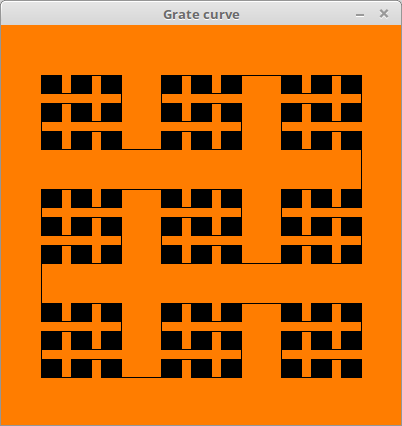
格子曲線。Gist。
require 'oekaki'
require_relative 'turtle'

Width, Height = 400, 400

Oekaki.app width: Width, height: Height, title: "Grate curve" do
  draw do
    clear(color(0xffff, 0x7dff, 0))

    t = Turtle.new(Width, Height, self)
    t.color(0, 0, 0)
    t.move(-160, 150)

    two = lambda do |a, c, w|
      return if c <= 1
      t.right(a)
      t.forward(1)
      t.right(a)
      t.forward(w)
      t.left(a)
      t.forward(1) if c > 1
      t.left(a)
      t.forward(w)
      two[a, c - 2, w]
    end

    square = lambda do |a, h, w|
      t.forward(w)
      two[a, h - 1, w]
    end

    grate = lambda do |n, a, w, h|
      if n.zero?
        square[a, h, w]
      else
        t.right(a)
        grate[n - 1, -a, h / 4, w]
        t.forward(h / 8)
        grate[n - 1,  a, h / 4, w]
        t.forward(h / 8)
        grate[n - 1, -a, h / 4, w]
        t.left(a)
      end
    end

    grate[4, 90, 320, 320]
  end
end
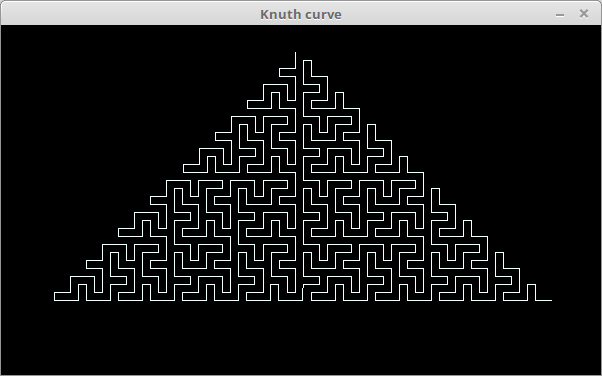
クヌース曲線。Gist。
require 'oekaki'
require_relative 'turtle'

Width, Height = 600, 350

Oekaki.app width: Width, height: Height, title: "Knuth curve" do
  draw do
    clear

    t = Turtle.new(Width, Height, self)
    t.color(0xf0ff, 0xffff, 0xffff)
    t.move(250, -100)
    t.left(180)
    step = 8

    drawing = lambda do |depth, a, tn|
      if depth.zero?
        t.right(45 + tn)
        t.forward(step)
        t.left(45 + tn)
      else
        t.right(2 * tn + a)
        drawing[depth - 1, 2 * tn, -tn]
        t.right(45 - 3 * tn - a)
        t.forward(step)
        t.left(45 - tn + a)
        drawing[depth - 1, 0, -tn]
        t.right(a)
      end
    end

    drawing[9, -90, 45]
  end
end
まだコードの意味はよくわかっていないのですが(汗)。よく考えてみたいと思います。