GitHub に SSH 接続

Linux Mintクリーンインストールし直したので、GitHub との SSH 接続をやり直す必要に迫られました。以下メモ。


公開鍵の作成。

$ ssh-keygen -t rsa

認証用のパスワードを二回入力する。

次に GitHub にログインして、SSH Key の登録をする。
[Settings]→[SSH and GPG keys]→[New SSH Key]
とすると入力画面になるので、[Title] のところには適当なタイトルを入れる。[Key] のところには、PC の ~/.ssh/id_rsa.pub の内容をコピペする。そして [Add SSH Key] で登録終了。

で、

$ ssh -T git@github.com

として認証されればおしまい。

あと、色いろやっていると

*** Please tell me who you are.

Run

  git config --global user.email "you@example.com"
  git config --global user.name "Your Name"

to set your account's default identity.

とか言われるかもしれないので、言われたらおとなしく言われたとおりにする。登録してあるメールアドレスとアカウント名を "" の中に書いて実行してやる。


ああ、疲れた。

Linux Mint 18(Ubuntu)で Irfan View を使う


Windows 用のフリーの画像ビューアーである「Irfan View」は、動作が軽快で使っている人も多いと思います。残念ながら Linux 版はないのですが、「Wine」を使って多少の工夫で Linux でも走らせることができます。Linux Mint 18 で確認しました。


まず、Linux に「Wine」をインストールして下さい。Linux Mint なら「ソフトウェアの管理」から入れられます。

次に、例えばここから、Irfan View 本体(32bit 版)と日本語モジュールをダウンロードします(どこからでもかまいません)。自分の落としたのは、本体が v.4.44、日本語モジュールが v.4.40.01 でした。以下、バージョンは適宜読み替えて下さい。


Irfan View 本体のファイル名は「iview444_setup.exe」などとなっています。これを Wine の cドライブの「c:/ windows/system32」へ移動させます。そして端末で

$ wine iview444_setup.exe

を実行して下さい。たぶん

err:module:import_dll Library MFC42.DLL (which is needed by L"G:\\home\\tomoki\\iview444_setup.exe") not found
err:module:LdrInitializeThunk Main exe initialization for L"G:\\home\\tomoki\\iview444_setup.exe" failed, status c0000135

というエラーが出ると思います。ライブラリ・ファイルが足りません。そのときは端末で

$ winetricks -q mfc42

を実行して下さい(winetricks が入っていなければ、$ sudo apt install winetricks でインストールする)。MFC42.DLL がインストールされればOKです。そうしたら、もう一度 $ wine iview444_setup.exe を実行してみて下さい。セットアップ・プログラムが立ち上がればOKです。


セットアップ・プログラムの設定は Windows の場合と同じです。これが終了すれば Irfan View が使えます。Wine メニューから「Irfan View 4.44」を選択・実行して下さい。


最後に日本語化します。ダウンロードした日本語モジュール irfanview_lang_japanese.exe を右クリックし、「Wine Windows プログラムローダー」を選択して実行してみて下さい。これはこれだけでOKな筈です。あとはふつうに Wine メニューから「Irfan View 4.44」を立ち上げ、[Options]メニューから[Change Language]項目を選んで設定ダイアログの“Language”画面を表示、“JAPANESE.DLL”を選択すればOKです。


これで軽快な画像ビューア「Irfan View」が Linux でも使えます。
なお、元のファイル「iview444_setup.exe」「irfanview_lang_japanese.exe」は削除してかまいません。


※参考
Use Irfanview in Linux with Wine - Technicus
[SOLVED] Irfanview in Wine

Ruby 実行のエラー時に n 回リトライするメソッド

n.times_retry でブロック内をエラーがあれば最大 n 回再実行し、それを超えれば停止します。エラーがないかリトライに成功すれば、そのまま次へ処理が渡されます。

引数の massage は true ならば情報を出力します(デフォルト true)。wait: n は retry の前に n秒スリーブします(デフォルトは 0)。ブロック引数の i は i 回目の実行ということです。

5.times_retry(message: true, wait: 1) do |i|
  puts i
  if i <= 3
    raise "sample error"
  end
end
puts "success"

__END__
#出力
1
Error: retry 1
times_retry.rb:23:in `block in <main>'
times_retry.rb:5:in `times_retry'
times_retry.rb:21:in `<main>'
2
Error: retry 2
times_retry.rb:23:in `block in <main>'
times_retry.rb:5:in `times_retry'
times_retry.rb:21:in `<main>'
3
Error: retry 3
times_retry.rb:23:in `block in <main>'
times_retry.rb:5:in `times_retry'
times_retry.rb:21:in `<main>'
4
success

 
メソッドのコード。

class Integer
  def times_retry(message: true, wait: 0)
    n = 1
    begin
      yield(n)
    rescue => e
      if n <= self
        puts "Error: retry #{n}" if message
        puts e.backtrace if message
        n += 1
        sleep(wait)
        retry
      end
      puts "Error: stop" if message
      raise e
    end
  end
end

GTK+で落書き 3(Ruby)


周転円みたいな。


ライブラリ「MyGtk」についてはこちら

require_relative 'mygtk'
include Math

L = 400
R1 = 150; R2 = (L - R1 * 2) / 2 - 5
STP1 = (PI / 180) * 0.5; STP2 = (PI / 180) * 10

MyGtk.app width: L, height: L do
  draw do
    color(5000, 0, 10000)
    rectangle(true, 0, 0, L, L)
  end

  i = 0
  
  id = timer(20) do
    x = L / 2 + (R1 * cos(STP1 * i) + R2 * cos(STP2 * i))
    y = L / 2 - (R1 * sin(STP1 * i) + R2 * sin(STP2 * i))
    color(0, 65535, 0)
    arc(false, x, y, 3, 3, 0, 64 * 360)
    i += 1
    Gtk.timeout_remove(id) if STP1 * i > PI * 2
    true
  end
end

コールバック関数は true を返さないといけません。

GTK+で落書き 2(Ruby)

MF / 今日の落書き Ruby/Tk で フィボナッチ配列(螺旋)
ここのパクリです。


ライブラリ「MyGtk」についてはここを参照。

require_relative 'mygtk'
include Math

ANGLE = 2 * PI * (1 + sqrt(5)) / 2

MyGtk.app width:300, height: 300, title: :Fibonacci do
  draw do
    color(0, 0, 0)
    rectangle(true, 0, 0, 300, 300)
    
    2000.times do |t|
      angle = t * ANGLE
      r = t * 0.1
      x = 147 + r * cos(angle)
      y = 147 + r * sin(angle)
      color(0, 65535, 0)
      arc(false, x, y, 3, 3, 0, 64 * 360)
    end
  end
end

ライフゲームの CoffeeScript 版

前回「コンウェイライフゲーム」を Ruby でシンプルに実装しましたが、今回その CoffeeScript 版です。ここで実行できるのがいいでしょう? 「実行」を押すとセルがランダムに生成されます。

セルの数:   

コード。HTML。

<form>
セルの数:<input type="text" name="num" size="4" value="170">
<input type="button" value="実行" onclick="start(this.form)">  
<input type="button" value="クリア" onclick="clear();">
</form>
<canvas id="Canvas" style="background-color: black;"></canvas>

CoffeeScript。 

width = 40; height = 40
cellwidth = 10; space = 3; margin = 8
wd = cellwidth * width  + space * (width  - 1) + 2 * margin
ht = cellwidth * height + space * (height - 1) + 2 * margin
ctx = f = w = id = null


Field = (width, height)->
  @width  = width
  @height = height
  @field = []
  for i in [0...(@width + 2)]
    @field[i] = []
    for j in [0...(@height + 2)]
      @field[i][j] = 0
  
  @generate = (n)->
    for i in [1..n]
      x = Math.floor(Math.random() * (@width  - 10)) + 5
      y = Math.floor(Math.random() * (@height - 10)) + 5
      @field[x][y] = 1
  
  @show = ->
    for x in [1..@width]
      for y in [1..@height]
        if @field[x][y]
          w.set(x, y)
        else
          w.reset(x, y)
  
  @windowx = (x)->
    margin + (x - 1) * cellwidth + (x - 1) * space
  
  @windowy = (y)->
    margin + (y - 1) * cellwidth + (y - 1) * space
  
  @next = ->
    nxf = []
    for i in [0...(@width + 2)]
      nxf[i] = []
      for j in [0...(@height + 2)]
        nxf[i][j] = 0
    for x in [1..@width]
      for y in [1..@height]
        n = @alive_cells(x, y)
        if @field[x][y]
          nxf[x][y] = 1 if n == 2 or n == 3
        else
          nxf[x][y] = 1 if n == 3
    @field = nxf
  
  @alive_cells = (x, y)->
    @field[x - 1][y - 1] + @field[x][y - 1] + @field[x + 1][y - 1] +
       @field[x - 1][y] + @field[x + 1][y] +
       @field[x - 1][y + 1] + @field[x][y + 1] + @field[x + 1][y + 1]
  
  null


Window = ->
  @set = (x, y)->
    ctx.fillStyle = "rgb(255, 255, 255)"
    @draw_cell(x, y)
  
  @reset = (x, y)->
    ctx.fillStyle = "rgb(0, 0, 0)"
    @draw_cell(x, y)
  
  @draw_cell = (x, y)->
    ctx.fillRect(f.windowx(x), f.windowy(y), cellwidth, cellwidth)
  
  null


mainloop = ->
  f.show()
  f.next()
  return


window.start = (e)->    #「実行」ボタンでここへ飛ぶ
  window.clearInterval(id) if id
  ctx.clearRect(0, 0, wd, ht)
  f = new Field(width, height)
  f.generate(parseInt(e.num.value))    #入力した数だけセルを生成する
  w = new Window()
  id = window.setInterval(mainloop, 200)
  return


window.clear = ->    #「クリア」ボタンでここへ飛ぶ
  window.clearInterval(id) if id
  ctx.clearRect(0, 0, wd, ht)
  return


$(window).load ->    #実際のコードは少しちがう
  cvs = document.getElementById("Canvas"); ctx = cvs.getContext("2d")
  cvs.width = wd; cvs.height = ht
  return

CoffeeScript では window.onload = が使えないので、jQuery$(window).load -> を使っている。

コンウェイのライフゲームを Ruby で実装してみた

有名なコンウェイのライフゲーム」を素朴に実装してみました。一種の生態系シミュレーションですね。ルールは簡単です。「セル」が集まって長方形領域を形成しているとき、それぞれの「セル」はまわりの 8つの「セル」の状態によって「生きる」か「死ぬ」かします。

  • 「セル」がないとき
    • まわりにちょうど 3つの「セル」があれば「誕生」します。
  • 「セル」があるとき
    • まわりに 0 または 1個の「セル」があれば過疎で「死に」ます。
    • まわりに 2 または 3個の「セル」があればそのまま「生き」ます。
    • まわりに 4個以上の「セル」があれば、過密で「死に」ます。

このパターンを繰り返します。
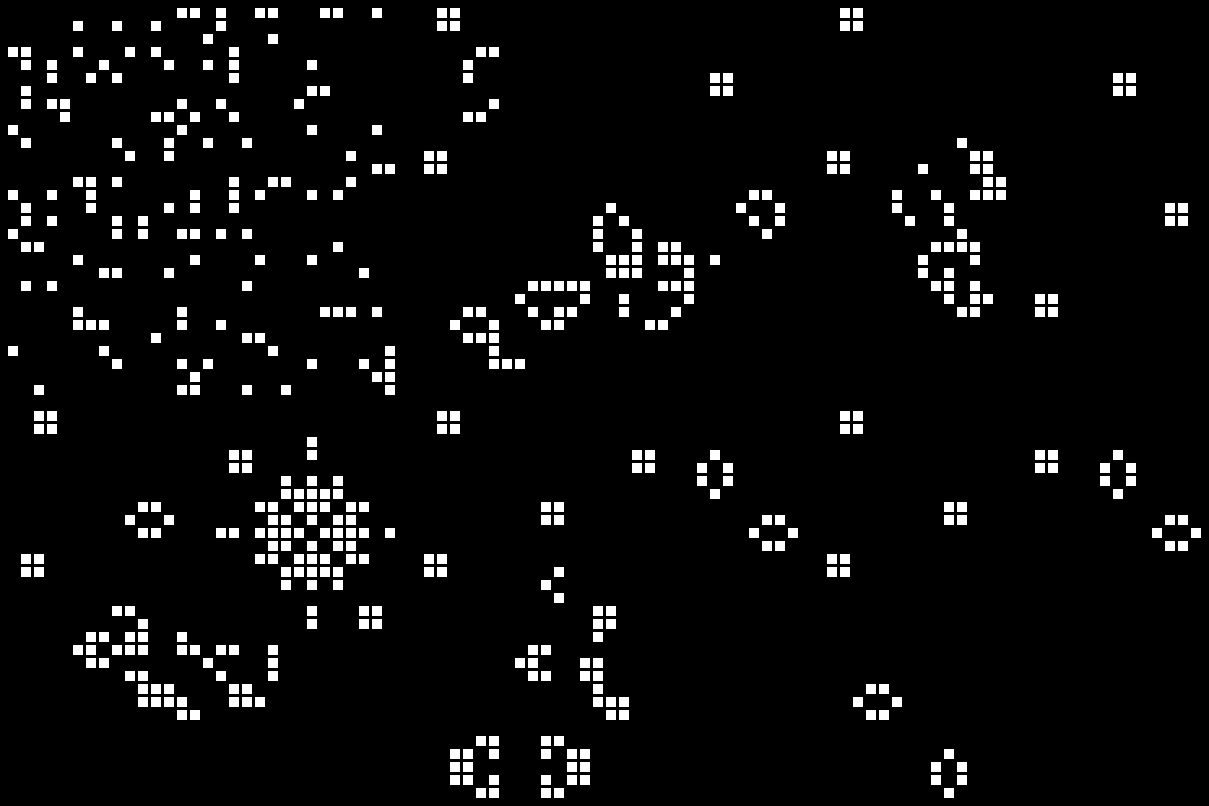


パターンはランダムに与えられ、毎回自動的に lifemap.txt に(上書き)記録されます。-r オプションをつけて実行すると、開始パターンを lifemap.txt からロードして実行します。描画には GTK+ を使っています。

ソースは以下です。Gist

require 'gtk2'

Width  = 30
Height = 30

class Component
  def initialize
    f = Field.new(Width, Height)
    f.generate(150)     #ランダムに150個セットする
    if ARGV[0] == "-r"
      File.open("lifemap.txt") {|io| f = Marshal.load(io)}
    else
      File.open("lifemap.txt", "w") {|io| Marshal.dump(f, io)}
    end
    @window = Gui.new(f)
    @disp = FieldDisplay.new(f)
  end
  
  def main
    @disp.show
  end
end

class Field
  def initialize(width, height)
     @width  = width
     @height = height
     @field = Array.new(@width + 2) {Array.new(@height + 2, 0)}
  end
  attr_reader :width, :height
  
  def set(x, y)
    @field[x][y] = 1
  end
  
  def reset(x, y)
    @field[x][y] = 0
  end
  
  def get(x, y)
    @field[x][y]
  end
  
  def generate(n)
    n.times {set(rand(@width) + 1, rand(@height) + 1)}
  end
  
  #次の世代を得る
  def next
    nxf = Array.new(@width + 2) {Array.new(@height + 2, 0)}
    @width.times do |x|
      @height.times do |y|
        x1, y1 = x + 1, y + 1
        n = alive_cells(x1, y1)
        if get(x1, y1).zero?
          nxf[x1][y1] = 1 if n == 3
        else
          nxf[x1][y1] = 1 if n == 2 or n == 3
        end
      end
    end
    @field = nxf
  end
  
  def alive_cells(x, y)
    get(x - 1, y - 1) + get(x, y - 1) + get(x + 1, y - 1) +
      get(x - 1, y) + get(x + 1, y) +
      get(x - 1, y + 1) + get(x, y + 1) + get(x + 1, y + 1)
  end
end

class Gui
  CellWidth = 10
  Space = 3
  Margin = 8
  
  def initialize(f)
    @f = f
    
    @w = Gtk::Window.new
    @width  = CellWidth * @f.width  + Space * (@f.width  - 1) + 2 * Margin
    @height = CellWidth * @f.height + Space * (@f.height - 1) + 2 * Margin
    @w.set_size_request(@width, @height)
    @w.set_app_paintable(true)
    @w.realize
    @drawable = @w.window
    @gc = Gdk::GC.new(@drawable)
    colormap = Gdk::Colormap.system
    
    @white = Gdk::Color.new(65535, 65535, 65535)
    @black = Gdk::Color.new(0, 0, 0)
    colormap.alloc_color(@white, false, true)
    colormap.alloc_color(@black, false, true)
  end
end

class FieldDisplay < Gui
  def initialize(f)
    super(f)
  end
  
  def show
    @w.signal_connect("expose_event") do
      @gc.set_foreground(@black)
      @drawable.draw_rectangle(@gc, true, 0, 0, @width, @height)
    end
    
    Gtk.timeout_add(160) do
      @f.width.times do |x|
        @f.height.times do |y|
          if @f.get(x + 1, y + 1).zero?
            reset(x + 1, y + 1)
          else
            set(x + 1, y + 1)
          end
        end
      end
      @f.next
    end
    @w.signal_connect("destroy") {Gtk.main_quit}
    @w.show
    Gtk.main
  end
  
  def set(x, y)
    @gc.set_foreground(@white)
    draw_cell(x, y)
  end
  
  def reset(x, y)
    @gc.set_foreground(@black)
    draw_cell(x, y)
  end
  
  def draw_cell(x, y)
    x1 = Margin + (x - 1) * CellWidth + (x - 1) * Space
    y1 = Margin + (y - 1) * CellWidth + (y - 1) * Space
    @drawable.draw_rectangle(@gc, true, x1, y1, CellWidth, CellWidth)
  end
end

Component.new.main


※追記(2018/1/18)
コンソール版も作ってみました。


※追記(2018/4/12)
フィールド・エディタ付きのを作ってみました。