Linux Mint 18 (Ubuntu 16.04) でサスペンド復帰後にキー入力ができなくなる

現在自分の使っている PC は VAIO Fit 15E mk2 VJF1521 ですが、Linux Mintサスペンド復帰後にキー入力が利かなくなるという不具合をずっと抱えていました。それを解決したのでやり方を記しておきます。自分がいま使っている OS は Linux Mint 18 ですが、Ubuntu などでも同じように行く場合があるようです。


これはキーボードコントローラが i8042 の場合に発生する現象のようです。まず、それを確認します。端末で

$ sudo lshal | grep i8042

を実行した時に i8042 の文字列がヒットすればそうです。なお、コマンド lshal はおそらくデフォルトでは入っていないと思います。その場合は

$ sudo add-apt-repository ppa:mjblenner/ppa-hal
$ sudo apt-get update
$ sudo apt-get install hal

でインストールして下さい。


該当の場合は $ gksu gedit など管理者権限で /etc/default/grub を次のように編集して下さい。GRUB_CMDLINE_LINUX_DEFAULT というのがあると思いますので、中身を "atkdb.reset i8042.nomux quiet splash" に換えます。そして $ sudo update-grub を実行したあと、PC を再起動します。これで上手くいったでしょうか。お疲れ様でした。


※参考
14.04 - Keyboard and mouse unresponsive after suspend - Ask Ubuntu
(SOLVED) Toshiba Satellite keyboard/touchpad suspend issue - Linux Mint Forums
[ubuntu] HOWTO: Fix touchpad, keyboard freeze on resume/thaw for laptops with i8042 controller

Python の Turtle でヒルベルト曲線

タートルグラフィックスは再帰的な図形を描くのに適しています。Python では組み込みで簡単にタートルグラフィックスが利用できるので(参照)、ヒルベルト曲線を描いてみました。

5次のヒルベルト曲線です。


コードは以下です。驚くほど簡単ですね。

from turtle import *

step = 10

def draw(depth, angle):
    if depth <= 0:
        return
    right(angle)
    draw(depth - 1, -angle)
    forward(step)
    left(angle)
    draw(depth - 1,  angle)
    forward(step)
    draw(depth - 1,  angle)
    left(angle)
    forward(step)
    draw(depth - 1, -angle)
    right(angle)

color('firebrick')
draw(5, 90)
input()

Windows と Linux のデュアルブート時に時計がずれるのを修正する

WindowsLinux では時間の取り扱い方がちがうので、デュアルブートしている場合は時刻がずれる場合があります。具体的にいうと LinuxUTC協定世界時)を採用しており、Windows のシステムでは localtime を採用しているからです。どちらを修正することもできるようですが、ここでは普段自分が使わない Windows の方を UTC に修正してみました。Windows 8.1Linux Mint 18 で確認しています。

Dual Boot: Fix Time Differences Between Ubuntu And Windows ~ Web Upd8: Ubuntu / Linux blog
基本的にこの記事を参考にしました。


まず、管理者権限で Windows の端末(コマンドプロンプト)を立ち上げ、

> sc config w32time start= disabled

を実行します。そして、ここから regファイルをダウンロードし、ダブルクリックします。これでレジストリを自動的に書き換えます。最後に端末で

> sc config w32time start= demand

を実行します。あとは再起動で Linux を立ち上げ、時刻を確認して、もう一度 Windows を立ち上げて正しい時刻が表示されれば OK です。

GTK+でヒルベルト曲線(Ruby)

前記事Ruby/GTK+ 用のモジュールを使って、ヒルベルト曲線を描いてみました。Ruby/Tk 版(参照)と殆ど同じです。

require './mygtk'

class Draw
  def initialize(n, slot)
    @lgth = Width / 2 ** n
    @y = (Width - @lgth * (2 ** n - 1)) / 2  #見栄えを整えているだけで、特に意味のない計算
    @x = Width - @y
    @oldx, @oldy = @x, @y
    @slot = slot
  end
  
  def ldr(n)
    return if n == 0
    dlu(n - 1); @x -= @lgth; dline
    ldr(n - 1); @y += @lgth; dline
    ldr(n - 1); @x += @lgth; dline
    urd(n - 1)
  end
  
  def urd(n)
    return if n == 0
    rul(n - 1); @y -= @lgth; dline
    urd(n - 1); @x += @lgth; dline
    urd(n - 1); @y += @lgth; dline
    ldr(n - 1)
  end
  
  def rul(n)
    return if n == 0
    urd(n - 1); @x += @lgth; dline
    rul(n - 1); @y -= @lgth; dline
    rul(n - 1); @x -= @lgth; dline
    dlu(n - 1)
  end
  
  def dlu(n)
    return if n == 0
    ldr(n - 1); @y += @lgth; dline
    dlu(n - 1); @x -= @lgth; dline
    dlu(n - 1); @y -= @lgth; dline
    rul(n - 1)
  end
  
  def dline
    firebrick  = @slot.color(45568,  8704,  8404)
    @slot.line(@oldx, @oldy, @x, @y, firebrick)
    
    @oldx, @oldy = @x, @y 
  end
end


Width = 400

MyGtk.app width: Width, height: Width, title: "Hilbert curve" do
  draw do
    ghostwhite = color(63488, 63488, 65535)
    rectangle(true, 0, 0, Width, Width, ghostwhite)
    
    n = (ARGV[0] || 5).to_i  #次数を引数に。デフォルトは5次
    exit if n < 1
  
    Draw.new(n, self).ldr(n)
  end
end

MyGtk.app のブロックの外へメソッドを持ち出したければ、self を持ち出してインスタンスにすれば可能です。Drawクラスでは @slot にブロック内の self が入っています。

GTK+でお絵かきしてみた(Ruby)

後記:2018/9/22) Gem の使い方のリファレンスを作りました。
Gem 'oekaki' リファレンス


Ruby だけだと遊びで線を引く程度のことも簡単でないので、RubyGTK+ を使ってシンプルにお絵かきするだけのモジュールを書いてみました。できるのは、点を打つ、線を引く、長方形を描く、円(楕円、弧)を描く、多角形を描く、文字の表示、画像の取得と表示、画像ファイルの読み込みと書き出し、キー入力、マウスクリック、そんなことくらいですか。

Gem 'gtk2' が必要です。
後注:このモジュールを RubyGem 'oekaki' として公開しました。参照MyGtk.app の代わりに Oekaki.app とするだけで、あとはすべて同じです。)


円を書いてみます。

require_relative 'mygtk'

MyGtk.app width: 300, height: 300 do            #ウィンドウの大きさは 300×300
  draw do
    white = color(65535, 65535, 65535)
    red   = color(65535, 0, 0)
    
    rectangle(true, 0, 0, 300, 300, white)        #画面全体を白く塗りつぶす
    arc(true, 0, 0, 300, 300, 0, 64 * 360, red)   #赤い円を描く
  end
end

モジュール 'mygtk' を require_relative しています。下のモジュール 'mygtk.rb' をカレントディレクトリに保存して下さい。以下、require_relative は同じなので書きません。
描画する部分を drawメソッドのブロックに入れます。ウィンドウの大きさの変更などで再描画される際にも呼び出されます。
rectangle は長方形、arc は円を描きます。第一引数の true は中を埋めて描くという意味です。(0, 0, 300, 300) は図形の左上隅の座標と横縦の大きさです。arc の (0, 64 * 360) は円弧の描画を開始する角度と終了する角度で、1°の 64分の1 が単位です。


線が移動していくアニメーションです。

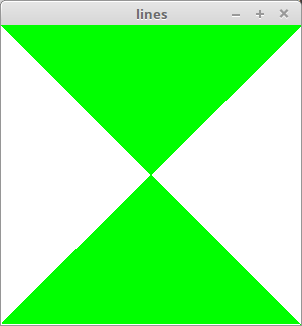
MyGtk.app width:300, height: 300, title: :lines do
  r = 0
  id = Gtk.timeout_add(40) do
    color(0, 65535, 0)
    line(r, 0, 299 - r, 299)    #線を描く
    Gtk.timeout_remove(id) if r >= 300
    r += 1
  end

  draw do
    color(65535, 65535, 65535)  
    rectangle(true, 0, 0, 300, 300)
  end
end

Gtk.timeout_add(interval) を直接使ってアニメーションにしています(interval は 1/1000秒単位です)。


画像ファイルから画像を読み込んで表示し、その上に点の雪を降らせるアニメーションです。エンターキーの入力で終了します(参照)。

MyGtk.app width: 300, height: 300 do
  timer(5) do
    color(65535, 65535, 65535)
    point(rand(300), rand(300))  
  end
  
  key_in do |w, e|                           #キー入力
    Gtk.main_quit if e.keyval == Gdk::Keyval::GDK_Return
  end

  draw do
    color(65535, 65535, 65535)
    rectangle(true, 0, 0, 300, 300)
  
    img = load_pic("import_codes/cairo_sample2.png")   #画像ファイルの読み込み
    show_pic(img, 0, 0)                                #読み込んだ画像の表示
  end
end

timer(interval) メソッドは interval の間隔でブロック内を繰り返し呼び出します(内部で Gtk.timeout_add を使っています)。ここでは点の雪を降らせています。
 

多角形と文字列を表示します。png ファイルとして出力もしています。

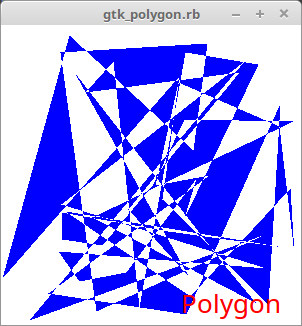
MyGtk.app width:300, height: 300 do
  draw do
    white = color(65535, 65535, 65535)
    red   = color(65535, 0, 0)
    blue  = color(0, 0, 65535)
    
    rectangle(true, 0, 0, 300, 300, white)
    
    ar = []
    50.times {ar << [rand(300), rand(300)]}    #線の数は50本(配列に座標を入れる)
    polygon(true, ar, blue)                    #多角形を描く
    
    text("Polygon", 180, 260, 20 * 1000, red)  #文字列を描く
    
    img = get_pic(0, 0, 300, 300)              #画像の取り込み
    save_pic(img, "sample.png")                #画像ファイルに保存
  end
end

print の 20 * 1000 はフォントの大きさです。指定の意味は GTK+ の仕様そのままです。


最後にモジュール本体のコードを置いておきます。
mygtk.rb

require 'gtk2'
require 'matrix'
include Math

module MyGtk
  W = Gtk::Window.new
  class Tool
    def initialize
      @window = W
      @drawable = W.window
      @gc = Gdk::GC.new(@drawable)
      @colormap = Gdk::Colormap.system
      @color = Gdk::Color.new(0, 0, 0)
      @fontdesc = Pango::FontDescription.new
      @width, @height = 0, 0
    end
    attr_reader :window
    attr_accessor :width, :height
    
    def color(r, g, b)
      @color = Gdk::Color.new(r, g, b)
      @colormap.alloc_color(@color, false, true)
      @color
    end
    
    def rectangle(fill, x, y, width, height, color = nil)
      set_color(color)
      @drawable.draw_rectangle(@gc, fill, x, y, width, height)
    end
    
    def arc(fill, x, y, width, height, d1, d2, color = nil)
      set_color(color)
      @drawable.draw_arc(@gc, fill, x, y, width, height, d1, d2)
    end
    
    def circle(fill, x, y, r, color = nil)
      arc(fill, x - r, y - r, 2 * r, 2 * r, 0, 64 * 360, color)
    end
    
    def point(x, y, color = nil)
      set_color(color)
      @drawable.draw_point(@gc, x, y)
    end
    
    def line(x1, y1, x2, y2, color = nil)
      set_color(color)
      @drawable.draw_lines(@gc, [[x1, y1], [x2, y2]])
    end
    
    def lines(array, color = nil)
      set_color(color)
      @drawable.draw_lines(@gc, array)
    end
    
    def polygon(fill, array, color = nil)
      set_color(color)
      @drawable.draw_polygon(@gc, fill, array)
    end
    
    def text(str, x, y, size, color = nil)
      set_color(color)
      @fontdesc.set_size(size)
      layout = Pango::Layout.new(W.pango_context)
      layout.font_description = @fontdesc
      layout.text = str
      @drawable.draw_layout(@gc, x, y, layout)
    end
    
    def set_color(color)
      @color = color if color
      @gc.set_foreground(@color)
    end
    private :set_color
    
    def load_pic(filename)
      GdkPixbuf::Pixbuf.new(file: filename)
    end
    
    def save_pic(img, filename, type = "png")
      img.save(filename, type)
    end
    
    def show_pic(img, x, y)
      @drawable.draw_pixbuf(@gc, img, 0, 0, x, y, img.width, img.height,
               Gdk::RGB::DITHER_NONE, 0, 0)
    end
    
    def get_pic(x, y, width, height)
      GdkPixbuf::Pixbuf.from_drawable(nil, @drawable, x, y, width, height)
    end
    
    def timer_stop(id)
      Gtk.timeout_remove(id)
    end
    
    def star(fill, x1, y1, x2, y2, color = nil)
      set_color(color)
      Star.new(fill, x1, y1, x2, y2, @color).draw
    end

    def clear(color = nil)
      color ||= Gdk::Color.new(0, 0, 0)
      set_color(color)
      rectangle(true, 0, 0, @width, @height)
    end

    def get_window_size
      W.size
    end
  end
  
  class Event < Tool
    def initialize
      super
    end
    
    def draw(&bk)
      W.signal_connect("expose_event", &bk)
    end
    
    def timer(interval, &bk)
      Gtk.timeout_add(interval, &bk)
    end
    
    def key_in(&bk)
      W.signal_connect("key_press_event", &bk)
    end
    
    def mouse_button(&bk)
      W.add_events(Gdk::Event::BUTTON_PRESS_MASK)
      W.signal_connect("button_press_event", &bk)
    end
    
    def make_window(&bk)
      w = Gtk::Window.new
      w.instance_eval(&bk)
      w.show_all
      w
    end

    def window_changed(&bk)
      W.signal_connect("configure_event") do
        @width, @height = get_window_size
        yield
      end
    end
  end
  
  class Star < Tool
    module Add
      refine Vector do
        def to_w(o)
          v = self
          [o[0] + v[0], o[1] - v[1]]
        end
      end
    end
    using Add
    
    def initialize(fill, x1, y1, x2, y2, color)
      @fill = fill
      @o = []; @a = []; @b = []
      @o[0], @o[1] = x1, y1
      @a[0] = Vector[x2 - x1, y1 - y2]
      θ = PI / 5
      rt1 = Matrix[[cos(θ), -sin(θ)], [sin(θ), cos(θ)]]
      rt2 = rt1 * rt1
      1.upto(4) {|i| @a[i] = rt2 * @a[i - 1]}
      t = cos(2 * θ) / cos(θ)
      @b[0] = rt1 * @a[0] * t
      1.upto(4) {|i| @b[i] = rt2 * @b[i - 1]}
      super()
      @color = color
    end
    
    def draw_triangle(n)
      ar = [@a[n].to_w(@o), @b[n].to_w(@o), @b[(n - 1) % 5].to_w(@o)]
      polygon(@fill, ar)
    end
    private :draw_triangle
    
    def draw
      if @fill
        5.times {|i| draw_triangle(i)}
        ar = []
        5.times {|i| ar << @b[i].to_w(@o)}
        polygon(@fill, ar)
      else
        ar = []
        5.times {|i| ar << @a[i].to_w(@o); ar << @b[i].to_w(@o)}
        polygon(@fill, ar)
      end
    end
  end
  
  class Turtle < Tool
    def initialize
      super
      @pen = Tool.new
      @pen_po = Vector[0, 0]
      @dir = Vector[1, 0]
      @color_t = [65535, 65535, 65535]
      @width, @height = @pen.get_window_size
    end
    attr_accessor :pen_po, :dir
    
    def left(deg)
      θ = PI * deg / 180
      @dir = Matrix[[cos(θ), -sin(θ)], [sin(θ), cos(θ)]] * @dir
    end
    
    def right(deg)
      left(-deg)
    end
    
    def forward(length, draw = true)
      next_po = @pen_po + @dir * length
      if draw
        @pen.color(*@color_t)
        @pen.line(@width / 2 + next_po[0], @height / 2 - next_po[1],
           @width / 2 + @pen_po[0], @height / 2 - @pen_po[1])
      end
      @pen_po = next_po
    end
    
    def back(length)
      forward(-length, false)
    end
    
    def color(r, g, b)
      @color_t = [r, g, b]
      @pen.color(*@color_t)
    end
    
    def circle(radius, fill = false)
      @pen.color(*@color_t)
      @pen.circle(fill, @width / 2 + @pen_po[0], @height / 2 - @pen_po[1], radius)
    end
    
    def move(x, y)
      @pen_po = Vector[x, y]
    end
  end
  
  def self.app(width: 300, height: 300, title: "gtk", resizable: false, &bk)
    W.title = title
    W.set_size_request(width, height)
    W.set_resizable(resizable)
    W.set_app_paintable(true)
    W.realize
    
    e = Event.new
    e.width, e.height = width, height
    e.clear
    
    e.instance_eval(&bk)

    W.signal_connect("destroy") {Gtk.main_quit}
    W.show_all
    Gtk.main
  end
end

class Gtk::Window
  def button(&bk)
    b = Gtk::Button.new
    b.instance_eval(&bk)
    b
  end
end

注意すべきは、draw や timer などの取るブロックは必ず true を返すようにして下さい。わかりにくいバグを引き起こすことがあります。
 

※参考
Ruby-GNOME2 Project Website - Ruby-GNOME2 Project Website

gnuplot で陰関数の表示(Ruby)

Python の matplotlib の plot_implicit による陰関数の描画がどうも信用ならないので、gnuplot でやってみることを考えた。しかし gnuplot 自体には陰関数を直接描画する機能はないので、工夫が必要となる。

gnuplot で陰関数を描く
基本的には上サイトでやっているように、3次元描画をして高さ 0 の等高線を描くという手段をとる。こんな感じになる。

描画した関数はひとつ前の記事と同じである。

Ruby コードは以下。なお、Gem は 'gnuplot' ではなく 'numo/gnuplot'を使った。この Gem の利用例はここに詳しい。

require 'bundler/setup'
require 'numo/gnuplot'

Numo.gnuplot do
  set "contour"      #等高線の描画を指定
  set "cntrparam levels discrete 0"    #指定された高さの点に等高線を引く
  set style: "line 1 lw 2"
  set style: "increment user"
  set isosamples: [100, 100]    #面描画に使用する線の数を設定する(3次元)
  unset "surface"    #網を表示しない
  unset "ztics"      #z軸の目盛の数値を表示しない
  set border: 15     #枠の設定(15は上下左右に枠を描く)
  set view: [0, 0]   #視点の設定(0,0はz軸方向から見る)
  set "zeroaxis"     #すべての軸の座標軸を表示する
  unset "key"        #関数名を書かない
  set xrange: -1.1..1.1
  set yrange: -1..1.6
  splot "x ** 6 + 3 * x ** 4 * y ** 2 + 6 * x ** 4 * y - 2 * x ** 4 + 3 * x ** 2 * y ** 4" +
    "- 2 *  x ** 2 * y ** 3 - 6 * x ** 2 * y ** 2 - 6 * x ** 2 * y + 3 * x ** 2 + y ** 6" +
    "- 3 * y ** 4 + 3 * y ** 2 - 1"
end

gets

どうも等高線の色を指定するのがうまくいかない。バグだろうか?
 
3次元で描いてみるとこんな感じ。


※参考
gnuplotコマンド集
Gnuplot's Tips
Gnuplot FAQ
gnuplot-ja

Python で陰関数のグラフの表示

ここを参考にしました。

関数は id:mathnb さんの出題されたものです(参照)。

コードはこんな感じ。plot_implicit というのが陰関数の表示なのでしょうね。

from sympy import *

x, y = symbols("x y")
f = x ** 6 + 3 * x ** 4 * y ** 2 + 6 * x ** 4 * y - 2 * x ** 4 + 3 * x ** 2 * y ** 4 \
    - 2 *  x ** 2 * y ** 3 - 6 * x ** 2 * y ** 2 - 6 * x ** 2 * y + 3 * x ** 2 + y ** 6 \
    - 3 * y ** 4 + 3 * y ** 2 - 1
plot_implicit(f, (x, -2, 2), (y, -2, 2))

なお、この場合の描画にはかなり時間がかかります。複雑な関数だからですかね。


※追記
描かれた線に厚みがある理由はまったくわかりません。Python に聞いてくれとしか言いようがないですね(って無責任)。これって間違っているのですかね。検証が要るかなあ。面倒くさいなあ。

もしこれが間違っているとすれば、僕が Python のライブラリをよく理解していないか、あるいはこの関数は次数が大きいので、Python浮動小数点演算の精度が問題になっているのかも知れませんね。