GTK+ で落書き 8(Ruby)

Gem 'oekaki' で落書きです。
oekaki | RubyGems.org | your community gem host
GTK+でお絵かきしてみた(Ruby) - Camera Obscura

 
再帰的な tree を描いてみました。画像では動きはないですが、じつはアニメーションです。


require 'oekaki'

Width, Height = 400, 300
Turn = 20
Length = 40
Ratio = 0.9
Depth = 8

θ = PI * Turn / 180
left  = Matrix[[cos( θ), -sin( θ)], [sin( θ), cos( θ)]]
right = Matrix[[cos(-θ), -sin(-θ)], [sin(-θ), cos(-θ)]]


Oekaki.app width: Width, height: Height, title: "tree" do
  draw do
    color(0, 0, 0)
    rectangle(true, 0, 0, Width, Height)
  end
  
  ar = [[Vector[Width / 2, 1], Vector[0, Length]]]
  branch_num = 0
  
  id = timer(80) do
    ob = ar.shift
    v1 = left  * ob[1]
    v2 = right * ob[1]
    p1 = ob[0] + v1
    p2 = ob[0] + v2
    
    color(0, 65535, 0)
    line(ob[0][0], Height - ob[0][1], p1[0], Height - p1[1])
    line(ob[0][0], Height - ob[0][1], p2[0], Height - p2[1])
    
    ar << [p1, v1 * Ratio]
    ar << [p2, v2 * Ratio]
    
    branch_num += 2
    Gtk.timeout_remove(id) if branch_num >= 2 ** (Depth + 1) - 2
    true
  end
end

いわゆる「スライドパズル(15パズル)」もどきを Ruby で解いてみる

スライドパズルっていうおもちゃがありますよね。4×4 のマス目に空白がひとつあって(残りはコマ)、コマは空白にスライドさせて動かすしかなく、それを特定のパターンに揃えるというものです。ここではルールを少し改変して、特定のマスを別の特定のマスに移動させるのに最短で何手かかるかを考えます。

例えば 3×2 のパズルでいちばん右下のマスが空白であり、いちばん左上のマスにあるコマをいちばん右下へもってくるには、最短で 9手かかります。

●●●
● ○

●●●
●○ 

●● 
●○●

● ●
●○●

●○●
● ●

●○●
 ●●

 ○●
●●●

○ ●
●●●

○● 
●●●

○●●
●● 

9手で終了

ただしこれは、下の方から見ていって下さい(プログラムの関係でそうなっています)。

僕が見たアルゴリズムパズルの本では、10×10 のパズルでやるのと同等な問題が与えてありました(駐車場で車を脱出させるという体裁になっていました)。これは自分の書いたプログラムだと、69手ということになります(調べたパターンの数は 8927個)。計算時間はこれだと(自分の環境で)およそ 41秒と、かなり微妙な数字になりました。瞬殺は無理でしたね。これ以上広いパズルだと、根本から考えなおさないとダメかも知れません。

コードは以下です。幅優先探索で求めています。また、既に出たパターンに逢着した場合はスキップしています。

class Parking
  def initialize
    start = Pattern.new
    start.car.x, start.car.y = 0, 0
    start.space.x, start.space.y = Width - 1, Height - 1
    @@patterns = [start]
  end
  
  def solve
    buffer = @@patterns.dup
    while (po = buffer.shift)
      [po.up, po.down, po.left, po.right].each do |i|
        next unless i
        if i[1]    #true ならば終了
          @@co = 0
          i[0].show
          puts "#{@@co - 1}手で終了"
          puts "調べたパターン数は#{@@patterns.size}"
          exit
        end
        buffer << i[0]
      end
    end
  end
end

class Pattern < Parking
  class Car   < Struct.new(:x, :y); end
  class Space < Struct.new(:x, :y); end
  
  def initialize
    @car   = Car.new
    @space = Space.new
    @parent = nil
  end
  attr_accessor :car, :space, :parent
  
  def up
    x, y = space.x, space.y - 1
    return false if y < 0
    check(x, y)
  end
  
  def down
    x, y = space.x, space.y + 1
    return false if y >= Height
    check(x, y)
  end
  
  def left
    x, y = space.x - 1, space.y
    return false if x < 0
    check(x, y)
  end
  
  def right
    x, y = space.x + 1, space.y
    return false if x >= Width
    check(x, y)
  end
  
  def check(x, y)
    nxt = Pattern.new
    nxt.space.x, nxt.space.y = x, y
    nxt.car = (@car.x == x and @car.y == y) ? @space : @car
    
    @@patterns.each do |pa|
      return false if nxt.car == pa.car and nxt.space == pa.space 
    end
    nxt.parent = self
    
    @@patterns << nxt
    [nxt, (nxt.car.x == Width - 1 and nxt.car.y == Height - 1)]
  end
  private :check
  
  def putout
    Height.times do |i|
      st = "" * Width
      st[@car.x]   = "" if @car.y   == i
      st[@space.x] = " " if @space.y == i
      puts st
    end
    puts
  end
  
  def show
    @@co += 1
    putout
    @parent.show if @parent
  end
  
  def inspect
    "<Pattern:car(#{@car.x},#{@car.y}), space(#{@space.x},#{@space.y})>"
  end
end

Width = 4; Height = 4

Parking.new.solve

なお、このプログラムは Pattern#putout で String リテラルの破壊的変更を行っています。
 
ちなみに「15パズル(4×4)」の場合、21手で終了します。時間は約 0.1秒です。

迷路の中を歩く(Ruby)

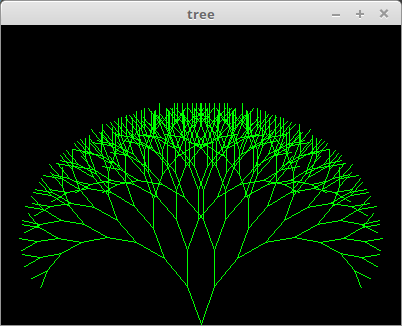
ひとつ前の記事で迷路を生成したので、その中を歩いてみるプログラムを書きました。OpenGL を使っています。Ruby 2.3.3, Linux Mint 18.3 で動作確認。


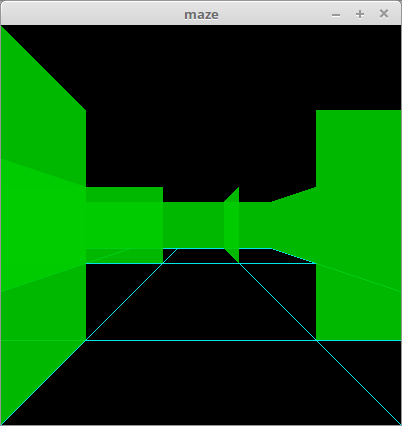
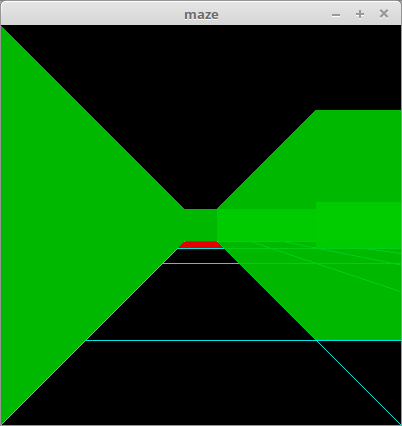
赤い床のマスがゴールです。"←" で左回転、"→" で右回転、"↑" で前進します。迷路は実行のたびに新たに生成されます。
ぐぐってみても意外とこんな単純なゲーム(?)の実装がないのですよねえ。
walk_maze.rb

require_relative 'miniopengl'
require_relative 'maze'

module WalkMaze
  def self.start(width, height, yokokabe, tatekabe)
    MiniOpenGL.app width: 400, height: 400, depth_buffer: :on, title: "maze" do
      px, pz = width - 1, height - 1    #迷路のスタート位置
      dir = [0, -1]                     #最初の向きの設定
      
      draw do
        glEnable(GL_BLEND)         #混合処理を可能にします
        glBlendFunc(GL_SRC_ALPHA, GL_ONE_MINUS_SRC_ALPHA)
        self.color_alpha = 0.9 
        glEnable(GL_DEPTH_TEST)    #隠面消去
        clear
        
        color(0, 1, 1)
        (height + 1).times {|z| line3(0, 0, z, width, 0, z)}
        (width  + 1).times {|x| line3(x, 0, 0, x, 0, height)}
        
        color(0, 0.8, 0)
        (height + 1).times do |z|
          width.times do |x|
            next if yokokabe[x + z * width].zero?
            vtx = [x, 0, z, x + 1, 0, z, x + 1, 1, z, x, 1, z]
            draw_vertex(GL_QUADS, 3, vtx)
          end
        end
        (width + 1).times do |x|
          height.times do |z|
            next if tatekabe[z + x * height].zero?
            vtx = [x, 0, z, x, 0, z + 1, x, 1, z + 1, x, 1, z]
            draw_vertex(GL_QUADS, 3, vtx)
          end
        end
        
        color(1, 0, 0)
        draw_vertex(GL_QUADS, 3, [0, 0, 0, 1, 0, 0, 1, 0, 1, 0, 0, 1])    #ゴールの床
        
        display
      end
      
      set_eye = ->{
        init_modelview
        x = px + 0.5
        z = pz + 0.5
        look_at(x, 0.5, z, x + dir[0], 0.5, z + dir[1], 0, 1, 0)
      }
      
      reshape do |w, h|
        viewport(0, 0, w, h)
        init_projection
        perspective(120, w / h.to_f, 0.2, 20)
        set_eye.()
      end
      
      check = ->{
        if dir[0].zero?
          z = (dir[1] < 0) ? pz : pz + 1
          f = yokokabe[z * width + px]
        else
          x = (dir[0] < 0) ? px : px + 1
          f = tatekabe[x * height + pz]
        end
        f.zero?
      }
      
      end_f = false
      
      key_in2 do |key|
        exit if end_f
        
        case key
        when GLUT_KEY_LEFT    #左
          dir = [dir[1], -dir[0]]
        when GLUT_KEY_RIGHT   #右
          dir = [-dir[1], dir[0]]
        when GLUT_KEY_UP      #前
          if check.()    #前へ進めるかどうか
            px += dir[0]
            pz += dir[1]
          end
        end
        
        set_eye.()
        redisplay
        
        if px.zero? and pz.zero?
          puts "Goal!"
          end_f = true
        end
      end
      
    end
  end
end


Width, Height = 10, 10

yokokabe, tatekabe = Maze.new(Width, Height).generate

#Left, Top = 20, 20
#CellWidth = 20
#
#fork { show_maze(Width, Height, yokokabe, tatekabe) }

WalkMaze.start(Width, Height, yokokabe, tatekabe)

maze.rb はひとつ前の記事です。miniopengl.rb はこちらを参照。

なお、LinuxOpenGL についてはこちらも参照。


※追記
これの立体版も作ってみました。
obelisk.hatenablog.com

Ruby で迷路作成

http://apollon.issp.u-tokyo.ac.jp/~watanabe/tips/maze.html
ここのリンク先のアルゴリズムを使って、迷路のジェネレーターを Ruby で書いてみました。リンク先でも Ruby での実装がありますが、自分でやってみました。


20×20の迷路です。


コードは以下です。迷路の作成と描画は別にしてあります。描画は自作の Gem 'oekaki' を使っています。
oekaki | RubyGems.org | your community gem host
GTK+でお絵かきしてみた(Ruby) - Camera Obscura
(※追記 以前は下のコードは自作のライブラリ 'utils' に依存していましたが、それを使わないように変更しました。(10/9))
maze.rb

require 'oekaki'

class Maze
  def initialize(width, height)
    @width, @height = width, height
    
    @yokokabe = Array.new(@width  * (@height + 1), 1)
    @tatekabe = Array.new(@height * (@width  + 1), 1)
    
    @left_wall = (@width..((a = @yokokabe.size) - @width - 1)).to_a
    @left_wall += ((a + @height)..(a + @tatekabe.size - @height - 1)).to_a
    @yokokabe_num = a
    
    @cells = Array.new(@width) {Array.new(@height)}
    #@cells にすべてちがう値の数を与える
    (@width * @height).times {|i| @cells[i % @width][i / @width] = i}
  end
  
  def generate
    break_wall until finish
    [@yokokabe, @tatekabe]
  end
  
  def wall_position(num)
    #flag, a
    flag = (num < @yokokabe_num)    #横壁なら true、縦壁なら false
    a = if flag
          @width
        else
          num -= @yokokabe_num
          @height
        end
    [flag, num % a, num / a - 1]
  end
  
  def replace(s, t)
    @width.times do |x|
      @height.times {|y| @cells[x][y] = t if @cells[x][y] == s}
    end
  end
  
  def break_wall
    #num, flag, x, y, a, b
    num = @left_wall[rand(@left_wall.size)]    #残された壁から壊す壁をランダムに選択する
    flag, x, y = wall_position(num)            #壊す壁の情報を得る
    @left_wall.delete(num)
    if flag
      #横壁
      return if (a = @cells[x][y]) == (b = @cells[x][y + 1])
      @yokokabe[num] = 0                       #実際に壁を壊す
    else
      #縦壁
      return if (a = @cells[y][x]) == (b = @cells[y + 1][x])
      @tatekabe[num - @yokokabe_num] = 0       #実際に壁を壊す
    end
    a, b = b, a if a < b
    replace(a, b)                              #壁を壊したあとに通路をつなげる
  end
  
  def finish    #@cell の値がすべて等しくなれば終了
    a = @cells[0][0]
    @cells.flatten.each {|b| return false if b != a}
    true
  end
end


def show_maze(w, h, yokokabe, tatekabe)
  wi = Left * 2 + w * (CellWidth + 1)
  he = Top  * 2 + h * (CellWidth + 1)
  
  Oekaki.app width: wi, height: he, title: "maze" do
    draw do
      clear
      
      color(65535, 65535, 65535)
      (h + 1).times do |y|
        w.times do |x|
          next if yokokabe[x + y * w].zero?
          x1 = Left + x * (CellWidth + 1)
          y1 = Top  + y * (CellWidth + 1)
          line(x1, y1, x1 + CellWidth + 1, y1)
        end
      end
      (w + 1).times do |x|
        h.times do |y|
          next if tatekabe[y + x * h].zero?
          x1 = Left + x * (CellWidth + 1)
          y1 = Top  + y * (CellWidth + 1)
          line(x1, y1, x1, y1 + CellWidth + 1)
        end
      end
      
      #save_pic(get_pic(0, 0, wi, he), "maze.png")    #画像ファイルの作成
    end
  end
end


if __FILE__ == $0
  Width, Height = 30,  20
  
  yokokabe, tatekabe = Maze.new(Width, Height).generate
  
  Left, Top = 20, 20
  CellWidth = 20
  
  show_maze(Width, Height, yokokabe, tatekabe)
end

メソッド Maze#generate で迷路を生成します。返り値は yokokabe と tatekabe で、それぞれ横方向と縦方向の壁をあらわす配列です(1 なら壁が存在し、0 なら存在しない。初期値はすべて 1)。メソッド Maze#break_wall は、壁をランダムにひとつ選んで、壊してもよい壁なら壊します。メソッド show_maze で迷路を表示します。ここで自家製の Gem 'oekaki' を使っています。png 画像ファイルに落とすことも出来ます。


※追記
これで作った迷路を実際に歩いてみるプログラムを書きました。

「等値」と「等価」は Ruby では?

これを見てどうも JavaC++ の話のように思ったのだが、最初の「『等値』と『等価』の違いを説明してください」というのがよくわからなかった。僕は Ruby しか知らない素人初心者プログラマなのだが、Ruby だとどういうことなのだろう。

ただ、Ruby でも「==」と「equal?」はちがうよね。

irb(main):001:0> a = "hoge"
=> "hoge"
irb(main):002:0> b = "hoge"
=> "hoge"
irb(main):003:0> a == b
=> true
irb(main):004:0> a.equal?(b)
=> false
irb(main):005:0> a.object_id
=> 47028457345780
irb(main):006:0> b.object_id
=> 47028458255160
irb(main):007:0> a = b = "hoge"
=> "hoge"
irb(main):008:0> a.equal?(b)
=> true

上を見ればわかると思うけれども、「==」はオブジェクトが同じ内容なら true、「equal?」は同じオブジェクトID でなければ true にならない。上の「等値」と「等価」というのは、これと関係があるのかな。

Ruby で関数型プログラミングもどき

上のリンク先で JavaScript を使って、オブジェクト指向プログラミングと関数型プログラミングの対比をやってあったので、Ruby に移植してみました。


課題:
唐揚げ弁当がいくつかあるとします。それぞれ唐揚げが複数入っています。
この中からx個の唐揚げをつまみ食いするプログラムを作りましょう。
つまみ食いはバレないようにするために、
その時点で最も唐揚げ数が多いお弁当から取るという仕様にします。

http://qiita.com/stkdev/items/5c021d4e5d54d56b927c


オブジェクト指向で。こんな感じですかね。

class Bento
  def initialize(dish, num)
    @dish = dish
    @num = num
  end
  attr_reader :num
  
  def eat
    @num -= 1
  end
  
  def show
    puts @dish + @num.to_s + ""
  end
end

order = [Bento.new("唐揚げ", 10), 
         Bento.new("唐揚げ",  8),
         Bento.new("唐揚げ",  6)]
         
5.times do
  max_bento = order.inject(order.first) {|r, bento| r = (bento.num > r.num) ? bento : r}
  max_bento.eat
  puts "-------"
  order.each {|x| x.show}
end

結果。

-------
唐揚げ9個
唐揚げ8個
唐揚げ6個
-------
唐揚げ8個
唐揚げ8個
唐揚げ6個
-------
唐揚げ7個
唐揚げ8個
唐揚げ6個
-------
唐揚げ7個
唐揚げ7個
唐揚げ6個
-------
唐揚げ6個
唐揚げ7個
唐揚げ6個


次は関数型プログラミングっぽく。元の JavaScript コードは上と同じ答えを返さないので、多少変更してあります。

order = [{dish: "唐揚げ", num: 10},
         {dish: "唐揚げ", num:  8},
         {dish: "唐揚げ", num:  6}]
         
show = ->(d) {puts d[:dish] + d[:num].to_s + ""}

show_all = ->(data) {data.each {|x| show[x]}}

select_eating_bento = ->(data) {
  data.inject(data.first) {|r, bento| r = (bento[:num] > r[:num]) ? bento : r}
}

eating_karaage = ->(data) {
  data.map do |bento|
    if bento.equal?(select_eating_bento[data])
      {dish: bento[:dish], num: (bento[:num] - 1)}
    else
      bento
    end
  end
}

eating = ->(num, data) {
  data = eating_karaage[data]
  puts "-------"
  show_all[data]
  eating[num - 1, data] if num > 1
}

eating[5, order]

「副作用」がないようにというのが目標ですね。
 
どちらがわかりやすいでしょうか。

元記事は色いろコメントで怒られていますね…。

「10分でコーディング」やってみた(Ruby)


たぶん10分以内にできたと思う。

問題は、num_player 人のプレーヤーに deck で与えられたカードを切るというもの。ただし、全員に同じ枚数だけ配らないといけない。

class Cards
  def deal(num_players, deck)
    ar = Array.new(num_players) {""}
    (deck.length / num_players).times do |i|
      num_players.times {|j| ar[j] += deck[i * num_players + j]}
    end
    ar
  end
end

p Cards.new.deal(4, "123123123")    #=>["12", "23", "31", "12"]
p Cards.new.deal(6, "01234")        #=>["", "", "", "", "", ""]


もう一問やってみた(15分)

問題なし。簡単。

class ReportAccess
  def who_can_see(user_names, allowed_data, report_data)
    ar = []
    user_names.each_with_index do |uname, i|
      ad = allowed_data[i].split(" ")
      catch(:exit) do
        report_data.each {|d| throw(:exit) unless ad.include?(d)}
        ar << uname
      end
    end
    ar
  end
end

ra = ReportAccess.new
p ra.who_can_see(["joe", "nick", "ted"],
                 ["clients products", "products orders", "clients orders"],
                 ["clients", "products"])
#=>["joe"]


さらにもうひとつ(10分)

問題なし。簡単。

class CCipher
  def decode(ciphertest, shift)
    st = ""
    ciphertest.each_byte do |byte|
      nb = byte - shift
      nb += 26 if nb < 65
      st += nb.chr
    end
    st
  end
end

p CCipher.new.decode("VQREQFGT", 2)    #=>"TOPCODER"

 
リンク先のブログ主は Java でコーディングしておられるが、Rubyist からは Java は書くことが多すぎるように見える。