Ruby で簡単な Gray-Scott

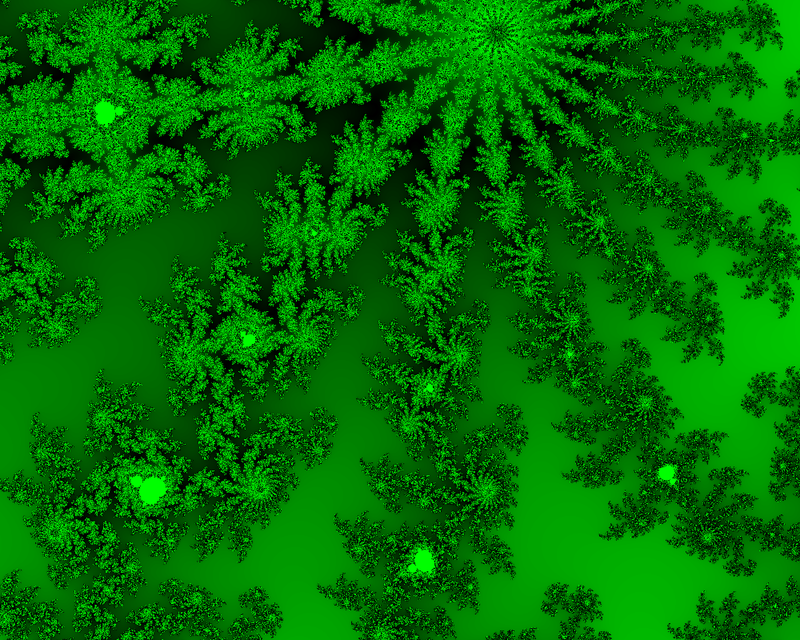
qiita.comここの Python 版を Ruby に移植しただけです。計算に Gem 'numo-narray' を使っています。画像化には Gem 'gdk_pixbuf2', 'rmagick' を使いました。できたものはこんな感じ。
20191115013736
 
Ruby コード。Ruby 2.6.0, Linux Mint 19.2 で動作確認。
gray_scott.rb

require 'numo/narray'
require 'gdk_pixbuf2'
require 'rmagick'

include Numo

SPACE_GRID_SIZE = 256
VISUALIZATION_STEP = 8
Dx = 0.01
Du = 2e-5
Dv = 1e-5

def laplacian(ary, base)
  #NArray オブジェクトのコピー
  inflow_from_top    = base.reshape(SPACE_GRID_SIZE, SPACE_GRID_SIZE)
  inflow_from_bottom = base.reshape(SPACE_GRID_SIZE, SPACE_GRID_SIZE)
  inflow_from_left   = base.reshape(SPACE_GRID_SIZE, SPACE_GRID_SIZE)
  inflow_from_right  = base.reshape(SPACE_GRID_SIZE, SPACE_GRID_SIZE)
  outflow            = base.reshape(SPACE_GRID_SIZE, SPACE_GRID_SIZE)
  
  #ラプラシアンの計算
  (SPACE_GRID_SIZE - 1).times do |i|
    inflow_from_top[i + 1, true]  = ary[i, true]
    inflow_from_bottom[i, true]   = ary[i + 1, true]
    inflow_from_left[true, i + 1] = ary[true, i]
    inflow_from_right[true, i]    = ary[true, i + 1]
  end
  outflow = ary * 4
  
  (inflow_from_top + inflow_from_bottom + inflow_from_left +
    inflow_from_right - outflow) / (Dx * Dx)
end

#計算(f, k の値によって反応が変わります)
def calc(u, v, f, k)
  u_base = SFloat.ones(SPACE_GRID_SIZE, SPACE_GRID_SIZE)
  v_base = SFloat.zeros(SPACE_GRID_SIZE, SPACE_GRID_SIZE)
  VISUALIZATION_STEP.times do
    partial_u = laplacian(u, u_base) * Du - u * v * v + (1.0 - u) * f
    partial_v = laplacian(v, v_base) * Dv + u * v * v - (f + k) * v
    u += partial_u
    v += partial_v
  end
  [u, v]
end


#初期設定
Dir.chdir("picture")

SQUARE_SIZE = 20

u = SFloat.ones(SPACE_GRID_SIZE, SPACE_GRID_SIZE)
v = SFloat.zeros(SPACE_GRID_SIZE, SPACE_GRID_SIZE)
square_start = SPACE_GRID_SIZE / 2 - SQUARE_SIZE / 2
square_end   = SPACE_GRID_SIZE / 2 + SQUARE_SIZE / 2
u[square_start..square_end, square_start..square_end] = 0.5
v[square_start..square_end, square_start..square_end] = 0.25

#画像の生成
400.times do |i|
  u, v = calc(u, v, 0.022, 0.051)
  
  for_visualize = UInt8.cast(u * 255)
  data = UInt8.zeros(SPACE_GRID_SIZE, SPACE_GRID_SIZE, 3)
  data[true, true, 0] = for_visualize
  data[true, true, 1] = for_visualize
  data[true, true, 2] = for_visualize
  
  pixbuf = GdkPixbuf::Pixbuf.new(data: data.to_string,
              width: SPACE_GRID_SIZE, height: SPACE_GRID_SIZE)
  pixbuf.save("%04d.png" % i)
end

#gif化
list = Magick::ImageList.new
Dir.glob("*").sort.each do |fn|
  list.concat(Magick::ImageList.new(fn))
end
list.delay = 3
list.write("gifanime.gif")

作業用にカレントディレクトリに 'picture' ディレクトリを作って下さい。このコードの場合だと、400ステップ分の画像を生成します。

なお、ラプラシアンの差分方程式化はここなどが参考になります。

※参考
Gray-Scott というのを作ってみた記録 – ✈
Numo::NArray概要 · ruby-numo/numo-narray Wiki · GitHub
 

f = 0.012, k = 0.05 の場合。
20191115014553
 
Gtk によるリアルタイム・アニメーション版はこちら。
https://gist.github.com/obelisk68/ecd97e79b87f69365a0fb0747ffcedca

文字列を一文字づつ飛ばし文字にするのこと(Ruby)

まず、「esehara」という文字列がある。この文字列を「eeaa」といったように、一文字ずつ飛ばし文字にするにはどうしたらいいか

http://bugrammer.hateblo.jp/entry/2016/10/24/175704

あるブログでこんなのを見て考えてみた。

コード例。

def one_jump(str)
  str.chars.each_slice(2).map {|a, *b| a}.join
end

puts one_jump("esehara")    #=>eeaa

こんなのでどうですかね。chars してから each_slice しているので、効率はあまりよくないかも知れない。一応ワンライナーではある。


文字列を一回しか走査しないバージョン(メソッド one_jump1)を書いてベンチマークを取ってみる。

require "benchmark"

def one_jump(str)
  str.chars.each_slice(2).map {|a, *b| a}.join
end

def one_jump1(str)
  flag = true
  result = ""
  str.each_char do |c|
    result << c if flag
    flag = !flag
  end
  result
end


str = [*""..""].join

Benchmark.bm do |x|
 x.report {one_jump(str) }
 x.report {one_jump1(str)}
end

結果。

       user     system      total        real
   0.008000   0.004000   0.012000 (  0.008788)
   0.004000   0.000000   0.004000 (  0.005388)

正確に半分の時間になっているな。しかしどちらも計算量は O(n) だろうから、大してちがわない。one_jump の方が短い Ruby コードのせいか、文字数を大きくすると差が縮まってくることが観測された。

GTK+ で落書き 18(Ruby)

どうでもよいのですが、遊んでみました。
20190729010046
種がそれっぽく描けない…。

oekaki_sample24.rb

require 'oekaki'
include Math

rs = 64 * (270 - 45)
rd = 64 * 90

Oekaki.app do
  draw do
    clear
    
    red   = color(0xffff, 0, 0)
    green = color(0, 0xffff, 0)
    black = color(0, 0, 0)
    
    arc2 = ->(fill, x, y, r, d1, d2, color = nil) {
      arc(fill, x - r, y - r, 2 * r, 2 * r, d1, d2, color)
    }
    
    arc2.(true, 150, 50, 180, rs, rd, green)
    arc2.(true, 150, 50, 150, rs, rd, red)
    
    n = 8
    n.times do |i|
      red_r = 80 + rand(3)
      rad = PI * (225 + 10 + (70.0 / n) * i) / 180
      
      circle(true, 150 + red_r * cos(rad), 50 - red_r * sin(rad), 3, black)
      red_r += 15
      circle(true, 150 + red_r * cos(rad), 50 - red_r * sin(rad), 3, black)
    end
  end
end

二重の扇形を描くのに組み込みのメソッド arc() では描きにくいので、arc2.() という関数を作りました。中心の座標と半径を与えれば描けます。

描画には自作の Gem 'oekaki' を使っています。
oekaki | RubyGems.org | your community gem host
GTK+でお絵かきしてみた(Ruby) - Camera Obscura

Ruby の dup と clone

Ruby でプロトタイプベースの OOP っぽいのをやるとき、ちょっと疑問に思ったので。

dup でオブジェクトをコピーすると、特異メソッドはコピーされません。なのでこれではプロトタイプベースの OOP には向きません。

$ pry
[1] pry(main)> a = Object.new
=> #<Object:0x000055900f87b7f8>
[2] pry(main)> class << a
[2] pry(main)*   def hello
[2] pry(main)*     puts "Hello!"
[2] pry(main)*   end  
[2] pry(main)* end  
=> :hello
[3] pry(main)> a.hello
Hello!
=> nil
[4] pry(main)> b = a.dup
=> #<Object:0x000055900f987ef8>
[5] pry(main)> b.hello
NoMethodError: undefined method `hello' for #<Object:0x000055900f987ef8>
from (pry):9:in `__pry__'

 
では、clone でコピーすると?

[6] pry(main)> c = a.clone
=> #<Object:0x000055900f9db3f0>
[7] pry(main)> c.hello
Hello!
=> nil

なるほど、こちらは可能なのですね。

※参考
https://docs.ruby-lang.org/ja/latest/class/Object.html#I_CLONE

推理判断のプレゼント交換の問題

rsc.hatenablog.comrsc さんのブログから問題を拝借しました。

問題:
A~Eの5人がプレゼント交換をした。5人とも自分以外の人から1つずつプレゼントを受け取ったが、プレゼントを渡した相手からプレゼントを受け取った人はいなかったという。さらに次のア~エのことがわかっているとき、確実にいえるのはどれか。
 ア.AはBからもDからもプレゼントを受け取らなかった。 
 イ.BはCかDからプレゼントを受け取った。 
 ウ.DはEからプレゼントを受け取らなかった。
 エ.EはBからもCからもプレゼントを受け取らなかった。
1.AはEにプレゼントを渡した。
2.BはCにプレゼントを渡した。
3.CはAにプレゼントを渡した。
4.DはBにプレゼントを渡した。
5.EはAにプレゼントを渡した。

http://rsc.hatenablog.com/entry/2019/04/07/235903

 
コードは以下です。Ruby で解いてみました。
solve.rb

Name = "ABCDE"
N = Name.size

def try(given)
  person = given.size
  if person == N
    #プレゼントを渡した相手からプレゼントを受け取った人はいないかチェック
    N.times {|i| return if i == given[given[i]]}
    
    #どの条件が当て嵌まるかチェック
    [[0, 4], [1, 2], [2, 0], [3, 1], [4, 0]].each_with_index do |c, i|
      if given[c.last] == c.first
        str = given.map.with_index {|p, i| "#{Name[p]}=>#{Name[i]}"}.join(", ")
        puts "[#{str}]"
        puts "正解: #{i + 1}"
      end
    end
  else
    left = [*0...N] - given
    left.each do |gift|
      next if gift == person
      
      case person
      when 0
        next if gift == 1 || gift == 3
      when 1
        next unless gift == 2 || gift == 3
      when 3
        next if gift == 4
      when 4
        next if gift == 1 || gift == 2
      end
      
      try(given + [gift])
    end
  end
end

try([])

Array#permutaion を使ってもよいのですが、敢て再帰を使って解いてみました。配列 given は、位置 i (0~4) の人物が given[i] の人物からプレゼントをもらったことを表わしています。
 
結果。

$ time ruby solve.rb
[E=>A, C=>B, A=>C, B=>D, D=>E]
正解: 5

real	0m0.115s
user	0m0.076s
sys	0m0.008s

これだったら Ruby も関数型言語?

anopara.net
わたしは初級者プログラマですが、ここでの話は納得、というか、Ruby プログラマなら常識みたいな話でもあると思います。Ruby はふつうに書いて関数型プログラミングのエッセンスを抽出しているといわれることもありますが、Ruby関数型プログラミングと相性がよいことはあまり知られていないのではないでしょうか。って初級者がいうことですけれどね。いや、map とか select とか inject を使えって、ただそれだけのことで、Rubyist なら常識だと思います。

上のブログの C# コードを再掲しておきます。

var maleEmps = new List<Employee>();
for(var e in employeeList){
    if(e.gender == "M")
        maleEmps.Add(e);
}

「従業員リストの中から男性のみを抽出したい」というようなコードだそうです。
 

var maleEmps = new List<Employee>();
for(var e in employeeList){
    if(e.gender == "M" && e.salary > 4000000)
        maleEmps.Add(e);
}

男性社員で年収400万以上の人を抽出したい。
 

var names = new List<String>();
for(var e in employeeList)
    names.Add(e.name);

社員の名前のリストを抽出したい。
 

var sum = 0;
for(var e in employeeList){
    if(e.gender == "M")
        sum += e.salary;
}

男性社員の年俸の合計を計算しています。
 

Ruby で「関数型プログラミング」っぽく

では、男性のみを抽出してみましょう。Scala だと

val maleEmps = employeeList.filter(e => e.gender == "M")

となるのだそうです。ワンライナーですね。じゃあ Ruby だと、select を使って

male_emps = employee_list.select {|e| e.gender == "M")}

という感じですか(変数名は Ruby 文化のスネークケースで書いています)。Ruby だとふつうですね。

どんどんいきましょう。
男性社員で年収400万以上の人を抽出したい。

male_400over_emps = employee_list.select {|e| e.gender == "M" && e.salary > 400_0000}

 
社員の名前のリストを抽出したい。

emp_names = employee_list.map(&:name)

map を使用。ここではブロック変数が省略可能なので、さらにシンプルになっています。

男性社員の年俸の合計を計算。

sum = employee_list.select {|e| e.gender == "M"}.inject(0) {|acc, e| acc + e.salary}

inject(畳み込み)を使用。あるいは Ruby 2.4 以降だと、Array#sum を使って

sum = employee_list.select {|e| e.gender == "M"}.map(&:salary).sum

でも OK です。
以上、上サイトの Scala の場合とほぼ同じように書けているのがわかります。


つまり、ここで「関数型プログラミング」っぽいといっているのは、Ruby ではふつうの文化だということがわかります。Ruby のブロックは、高階関数を可読性の高い形で書くのにぴったりなのです。というのは、もちろん Rubyist には当り前の話なのですが。

Ruby でマンデルブロ集合を描画

qiita.comQiita 記事を見てやってみたくなりました。ほとんどパクリです。Numo::NArray を使っています。


実行結果。
20190608211301
 
コード。
mandelbrot_narray.rb

require 'numo/narray'
require 'gdk_pixbuf2'
include Numo

MaxCalc = 5000      #最大計算回数(数字が大きいと細部がくっきりします)
W, H = 1000, 800    #画像サイズ

#計算(size_w: 横幅の長さ, x: 画像中心のx座標, y: 画像中心のy座標)
def mandel(size_w, x, y)
  size_h = size_w * H / W
  c = (DComplex.new(1, W).seq / W * size_w - size_w / 2 + x) +
      (DComplex.new(H, 1).seq / H * size_h - size_h / 2 - y) * Complex(0, 1)

  z = DComplex.new(H, W).fill(0)
  count = Int32.zeros(W, H)
  idx = Int32.new(W, H).seq

  (1..MaxCalc).each do |i|
    z = z ** 2 + c
    idx_t = (z.abs >  2).where
    idx_f = (z.abs <= 2).where
    count[idx[idx_t]] = i
    break if idx_f.empty?

    idx = idx[idx_f]
    z = z[idx_f]
    c = c[idx_f]
  end
  count
end

#データ生成
data0 = mandel(0.004, 0.3801718623708117, 0.19031789808145916)

#画像化
data = UInt8.zeros(W, H, 3)
data[true, true, 1] = (data0 % 255 - 127).abs * 2    #着色

pixbuf = GdkPixbuf::Pixbuf.new(data: data.to_string, width: W, height: H)

pixbuf.save('mandel.png')

 
いちばん基本的なマンデルブロ集合は mandel(4.0, 0.0, 0.0) という感じで生成します。
20190608121156
色の付け方をあれこれ工夫したいところですね。

こんなのも。mandel(0.004, 0.30145277714203783, 0.024192503140736933) でやってみた。
20190608212923

 
※参考
Numo::NArray概要 · ruby-numo/numo-narray Wiki · GitHub
NArrayの簡単なつかい方 - Qiita
マンデルブロ集合の不思議な世界
 
※追記
よく考えたらこれでは上下が逆転するので、コードを修正しました。上の画像はすべて上下が反転しています。


追加。mandel(0.004, 0.282, -0.01)
20190608221942